IBM Integration PoT Labs Home page
Discover how event automation makes it easy to create new Kafka event streams from existing message queues
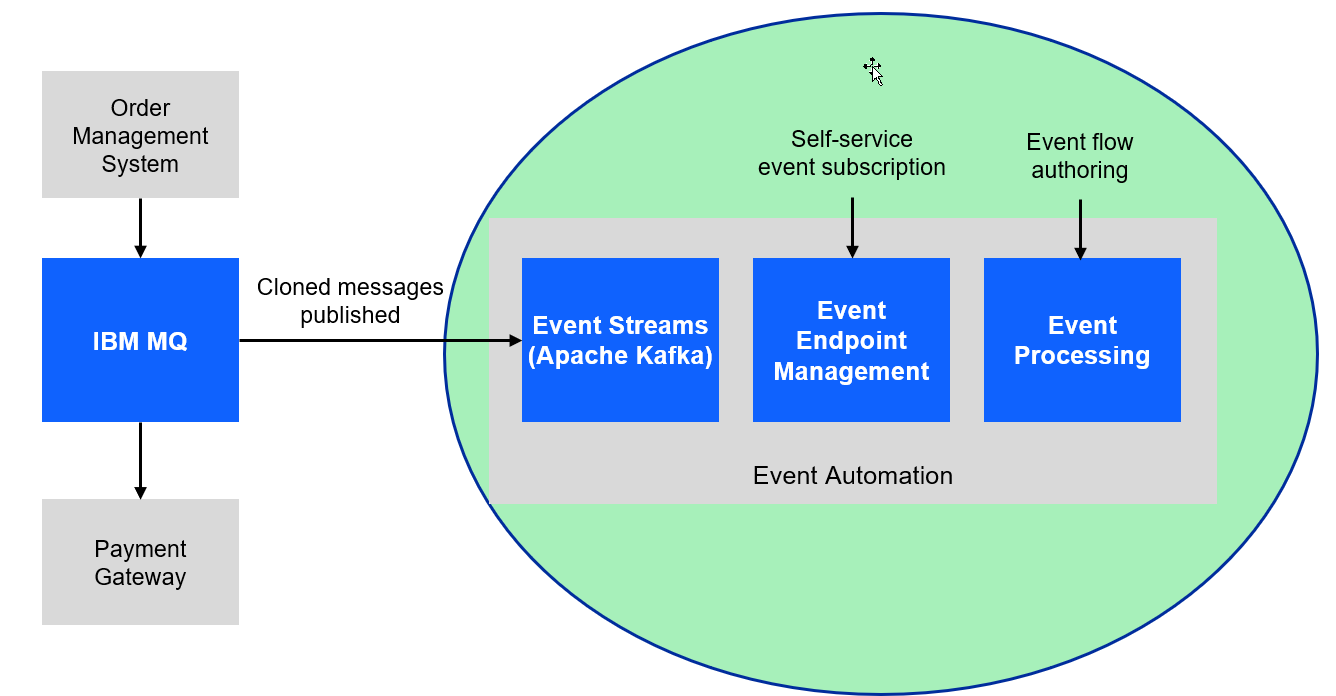
For this scenario, you will use a fictitious company Focus Corp who’s integration team will be asked to exposes the enterprise’s data using event streams. This will allow application teams to subscribe to the data without impacting the backend system, decoupling development, and lowering risks. The order management system and its payment gateway exchange customer orders over IBM MQ.
Note: In the messaging experince lab 2 we went thru the process of setting up streaming Queues and connect to a new topic.
In this lab we will continue using topics that have already been published in Event Endpoint Management gateway. It will contain the same messages.
1.1 Discover the topic to use
In this lab the instructor will act as the Event Endpoint Management administrator to expose the topics that students will need to complete the labs.
Event Endpoint Management provides the capability to describe and catalog your Kafka topics as event sources, and to share the details of the topics with application developers within the organization. Application developers can discover the event source and configure their applications to subscribe to the stream of events, providing self-service access to the message content from the event stream.
Access to the event sources are managed by the Event Gateway. The Event Gateway handles the incoming requests from applications to consume from a topic’s stream of events. The Event Gateway is independent of your Kafka clusters, making access control to topics possible without requiring any changes to your Kafka cluster configuration.
-
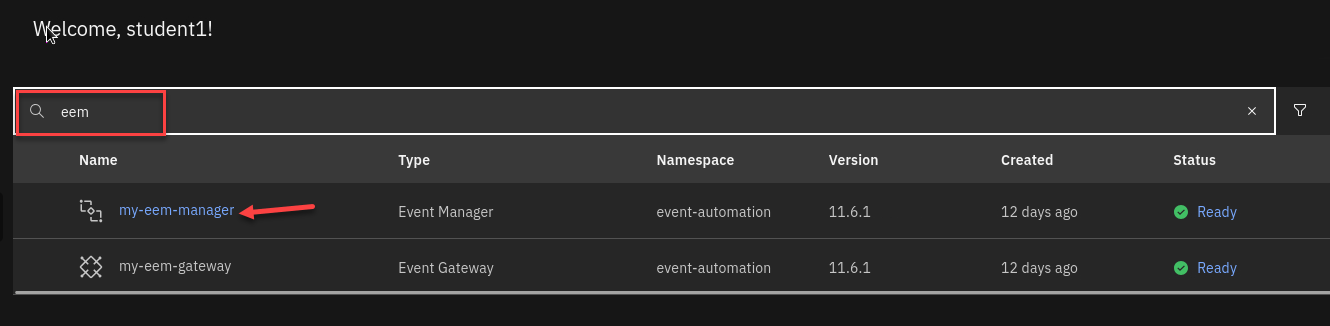
We will now login to the EEM screen. In the search bar enter eem
Right click on my-eem-manager and open in new tab.
-
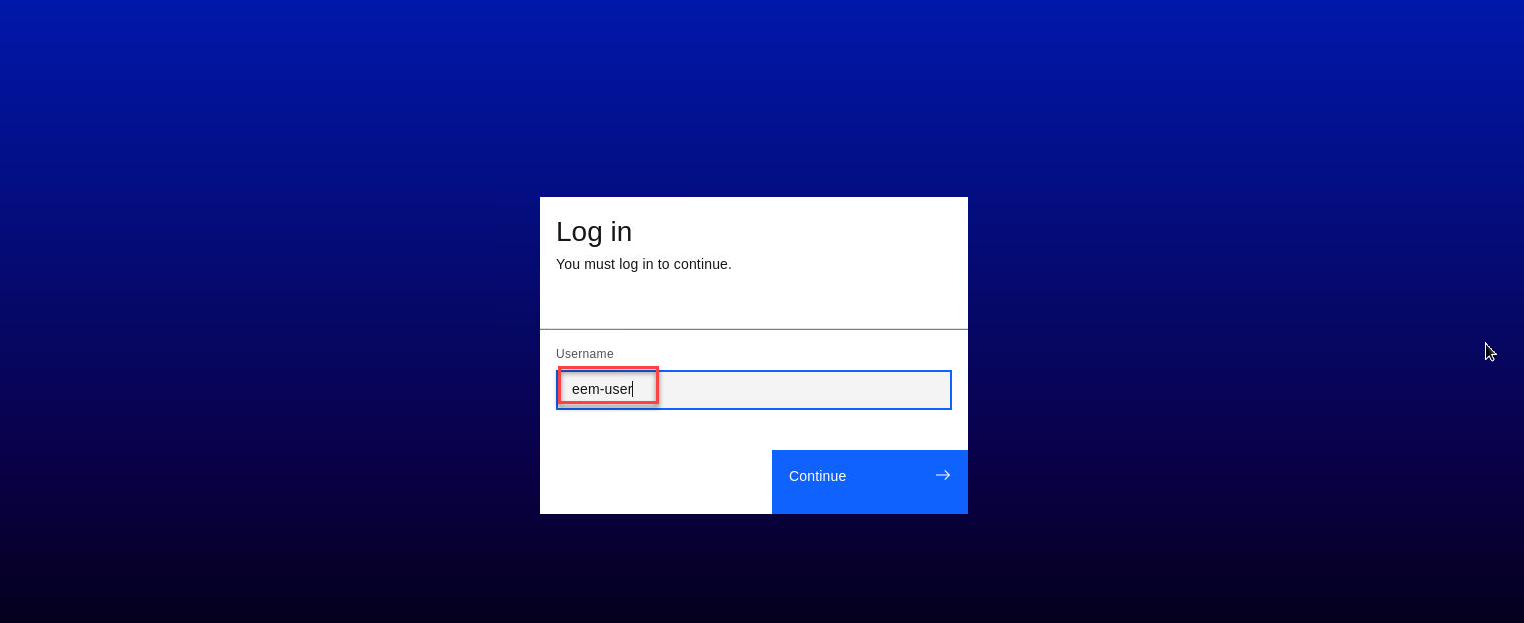
Login to the EEM home page as eem-user and the password is passw0rd
-
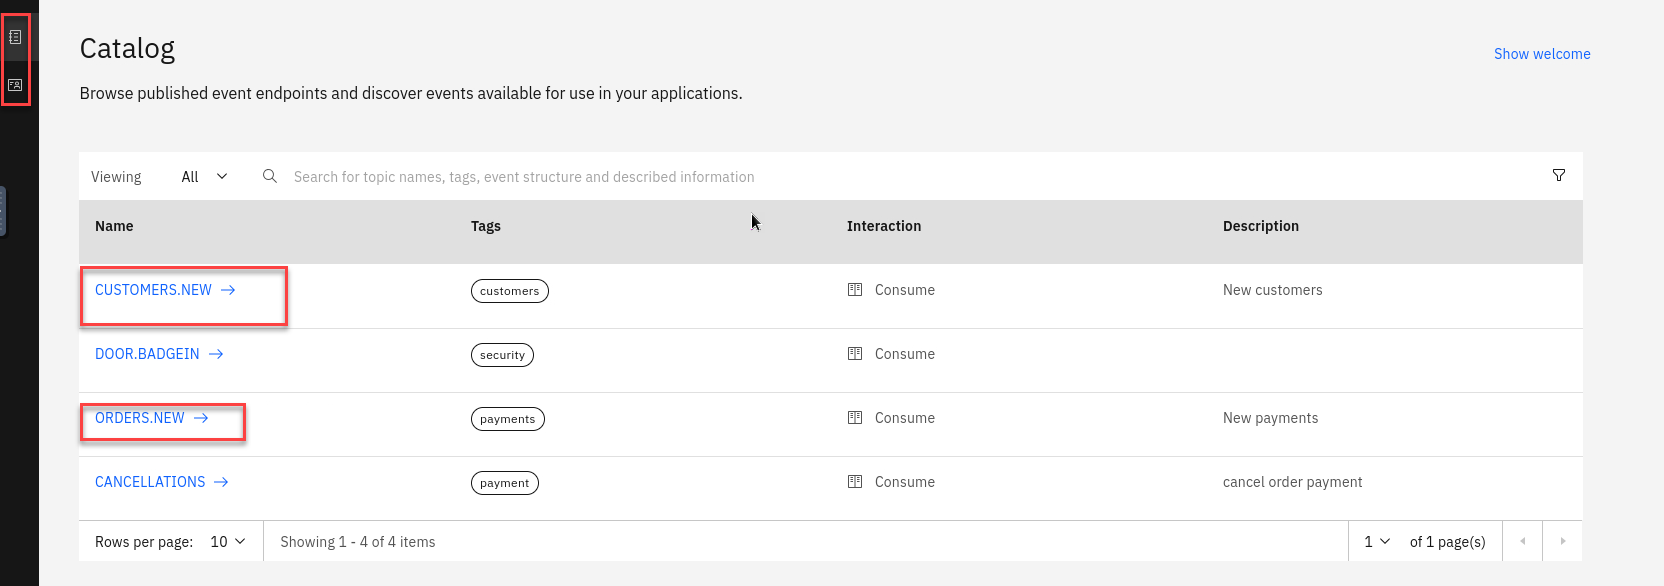
Go to the Event Endpoint Management catalog home page and find the ORDERS.NEW topic.
You will notice that as a user you will only have access to the Catolog page and Subscription page.
-
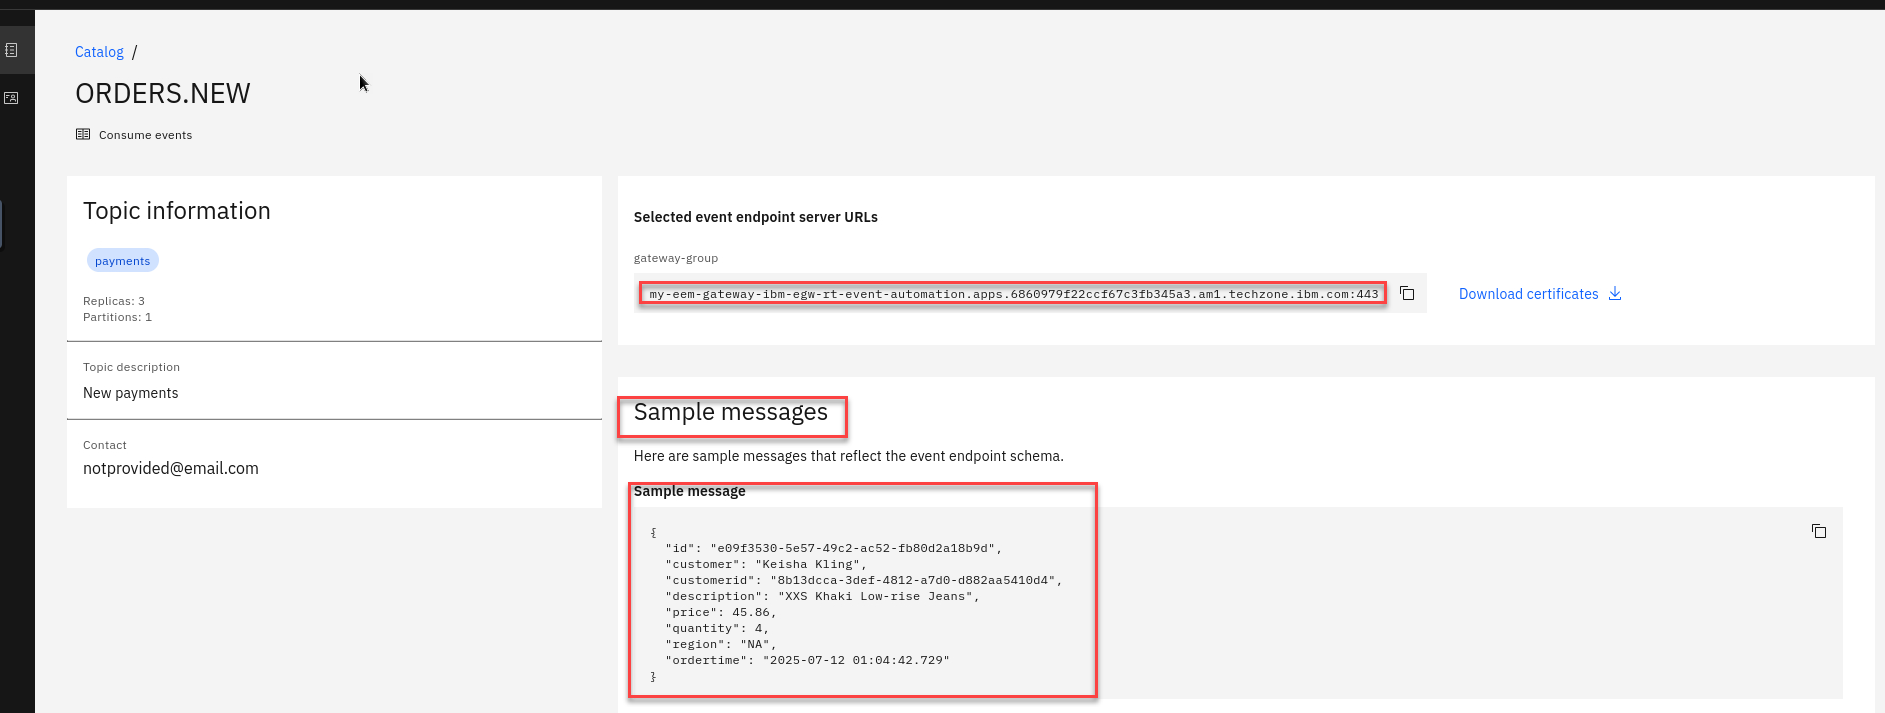
Click on the ORDERS.NEW topic to review the information about the events that are available here. Look at the schema to see the properties in the order events. You can also review Code accelerator to see code samples.
-
Will will also see what Controls have been created for this Topic. For the ORDERS.NEW we will be using the Self service Control
Go to top of page and select Subscribe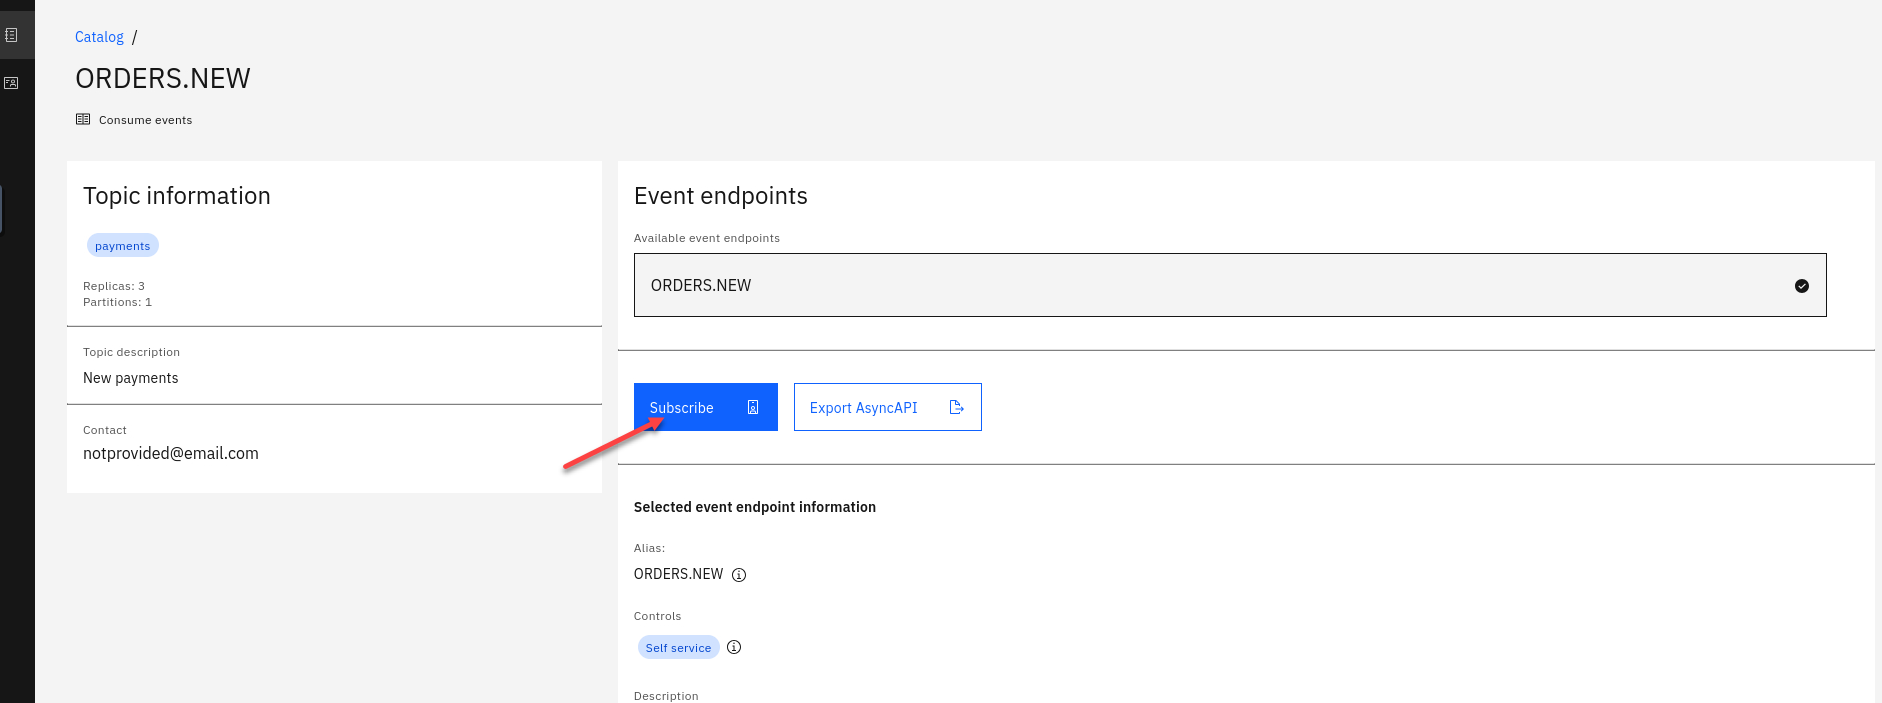
-
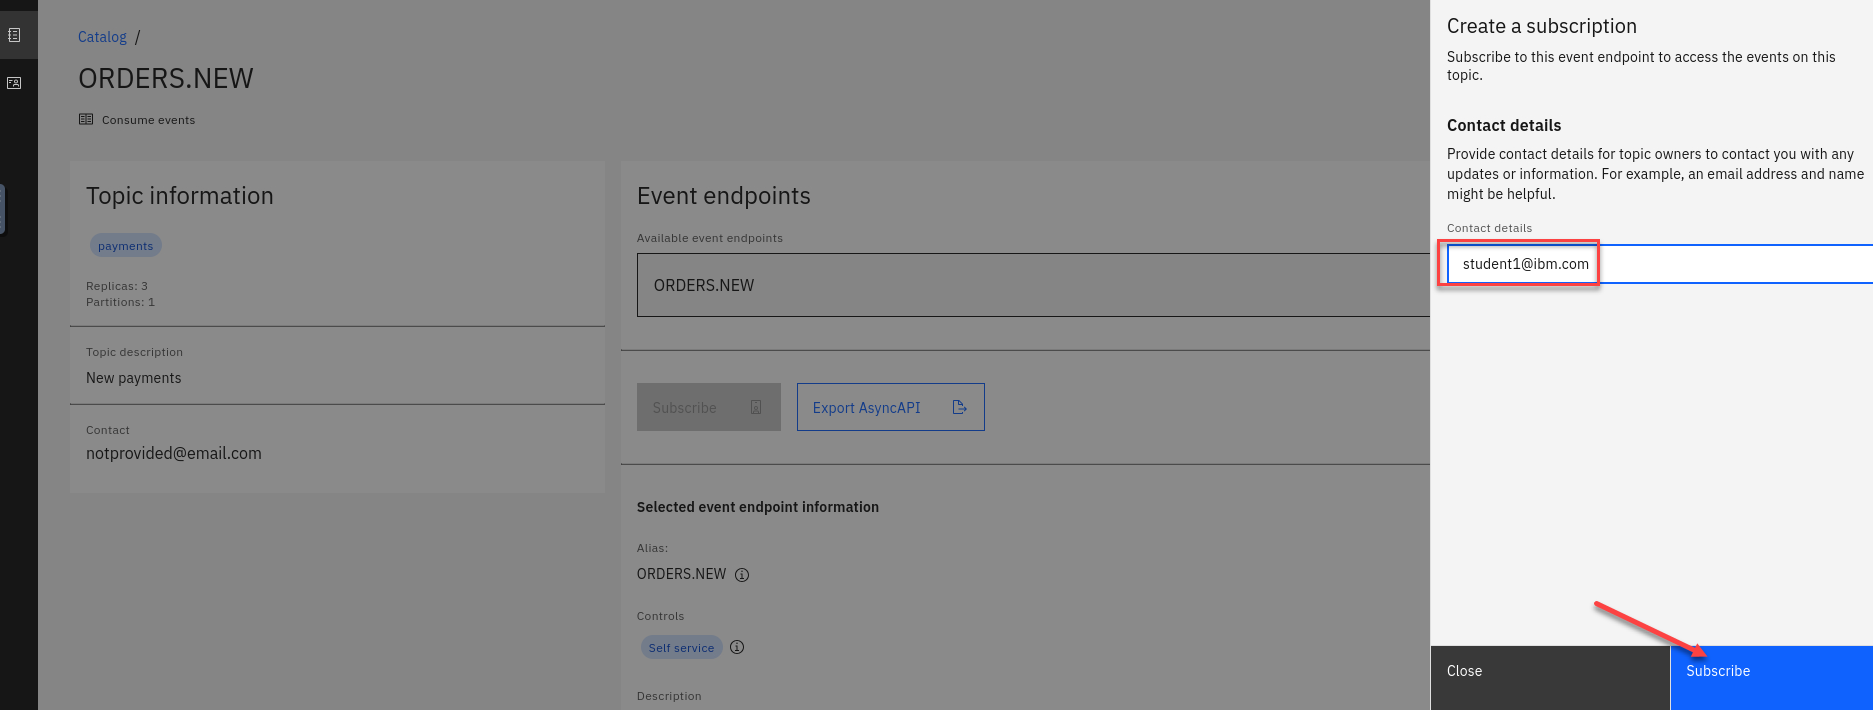
On the right hand side enter an email address. For this just use your student id.
Click Subscribe
-
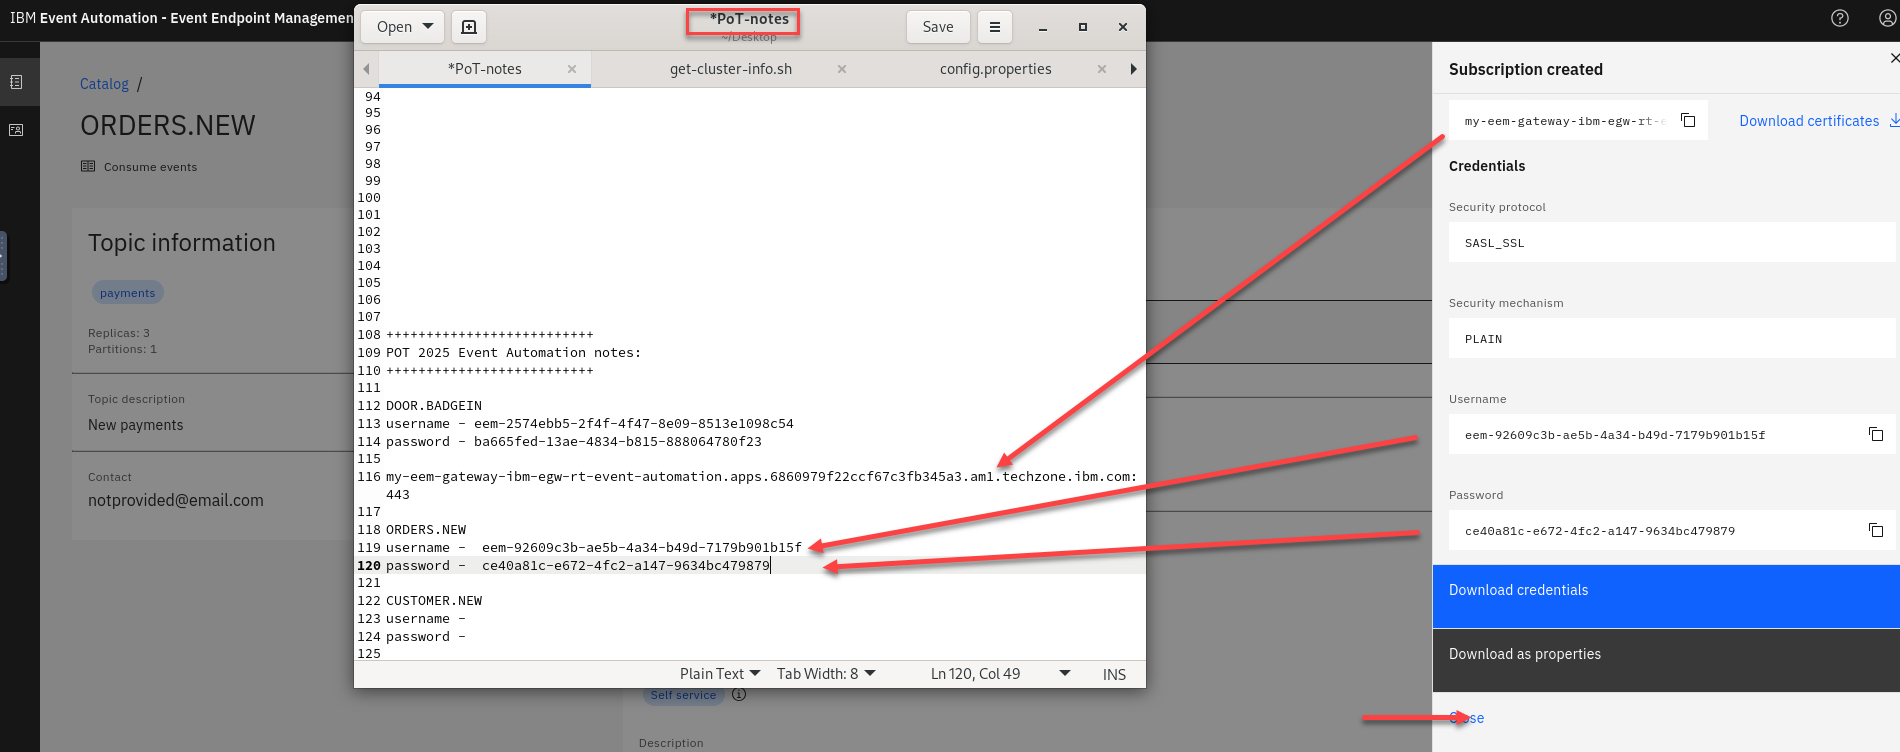
You will now see your Access Credentials. You will need to save these for later. On the Desktop if you open the POT-notes file that is a scratch pad to save credentials and other info for the labs.
Save the Username and Password under Orders New in the file. Also save the gateway-group url
Note: This will be the same for all the topics you subscribe to so save just once.
-
Repeat steps 3-7 for the CUSTOMER-NEW topic
1.2 Event Automation Processing
IBM Event Automation touts a scalable, low-code event stream processing platform that helps you automate and act on data in real-time. It also enables you to filter, aggregate, transform and join streams of events with assistance and validation at each step. Likewise, it lowers the skills barrier and empowers both business and IT users to define business scenarios and detect when they arise and respond in realtime. Event processing works with any Kafka implementation, and also any other kind of event broker that implements the Kafka Protocol.
1.2.1 Event Automation Processing
-
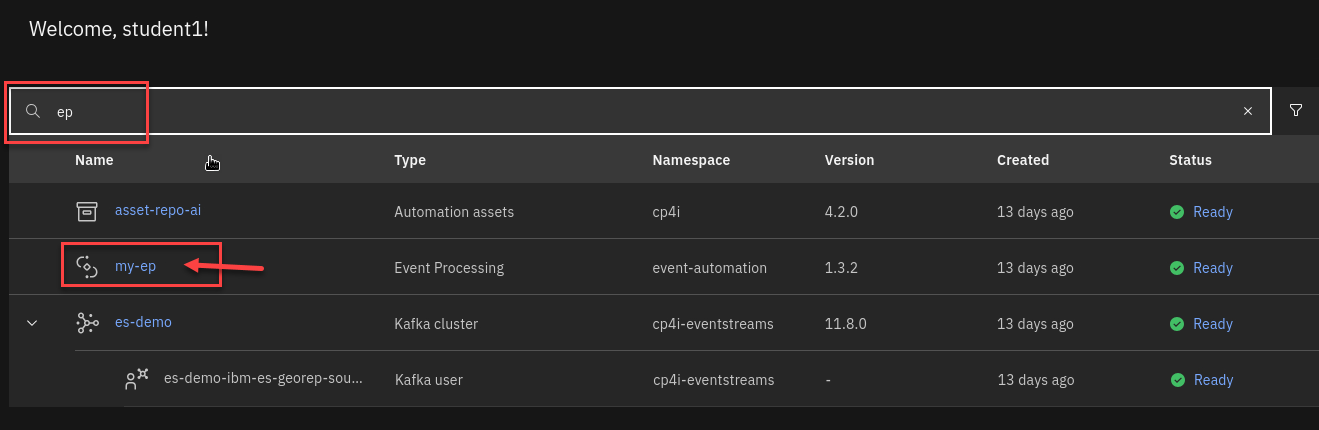
We will now login to the Event Processing screen. In the search bar enter ep
Right click on my-ep and open in new tab.
-
Create a flow, and give it a name and description to explain what you will use it for.
Name your Flow Student Name-payment
for example student1-paymentAnd add a Description (ex: POT Event processing payment lab)
Click Create
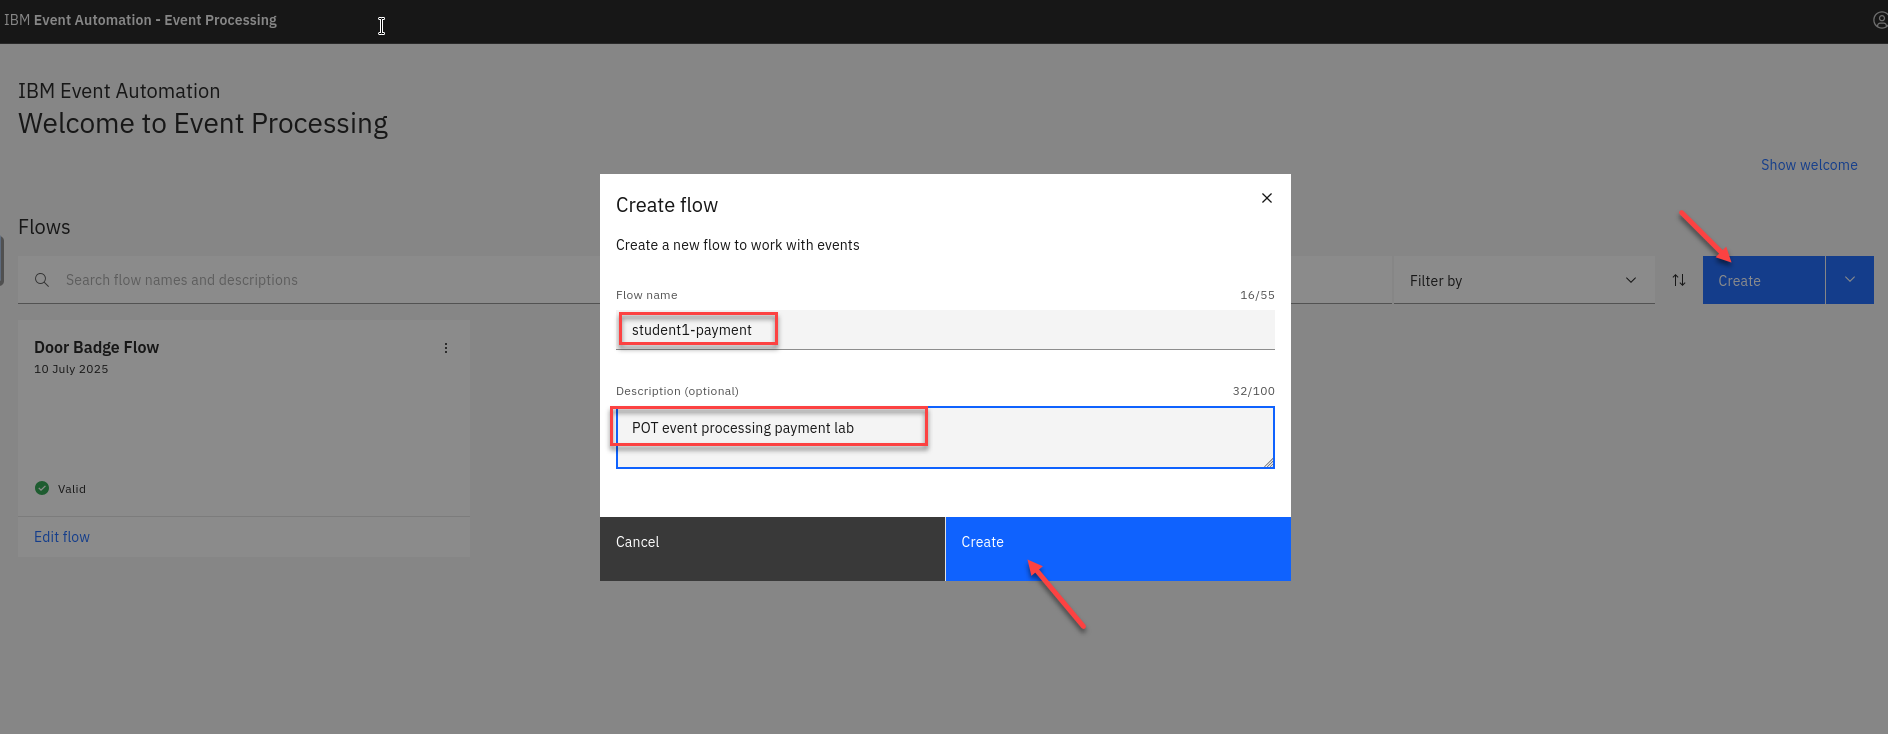
Note: You will see other student flows so make sure to to add your student id to the flow name.
The next step is to bring the stream of events you discovered in the catalog into Event Processing.
-
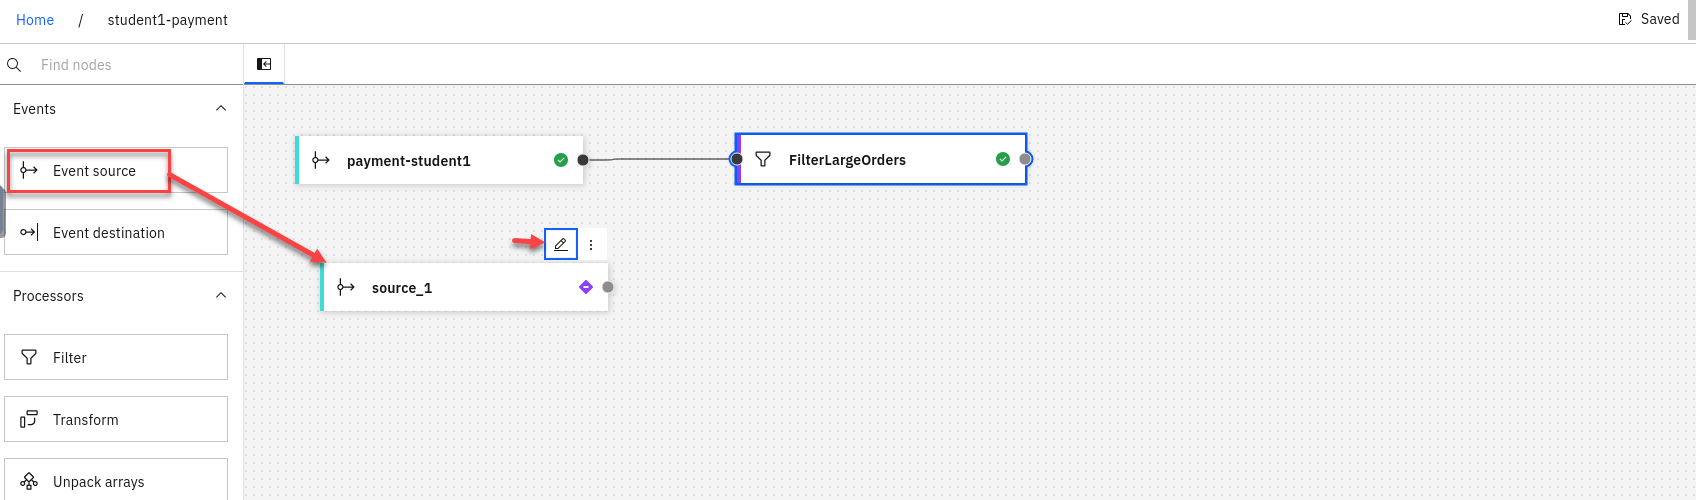
You will now be on the canvas. You will have a source node already on the canvas.
To configure the event source node hover over the node and select the pen icon.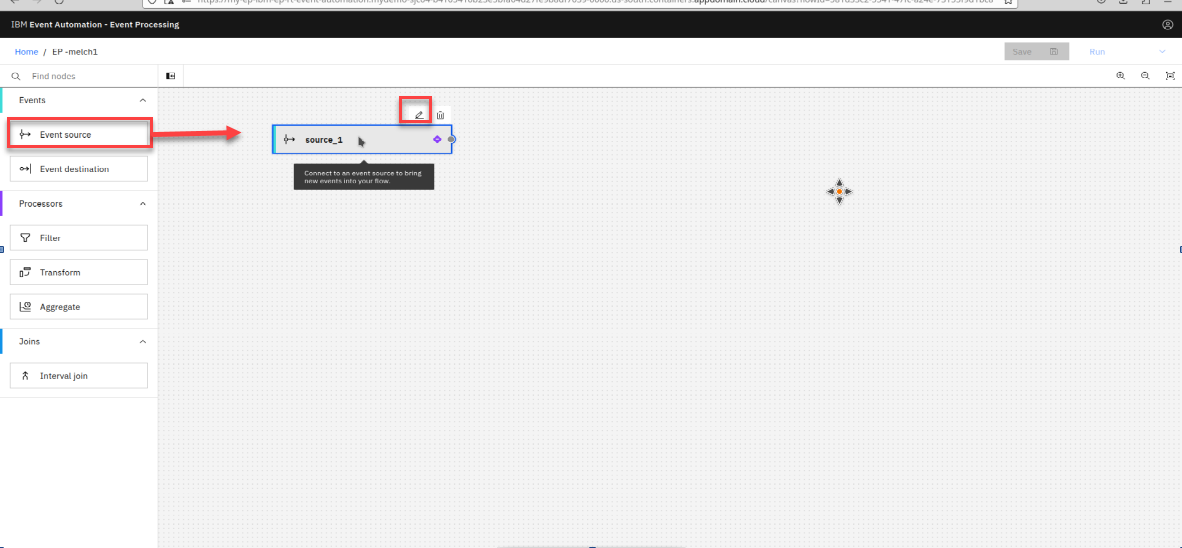
-
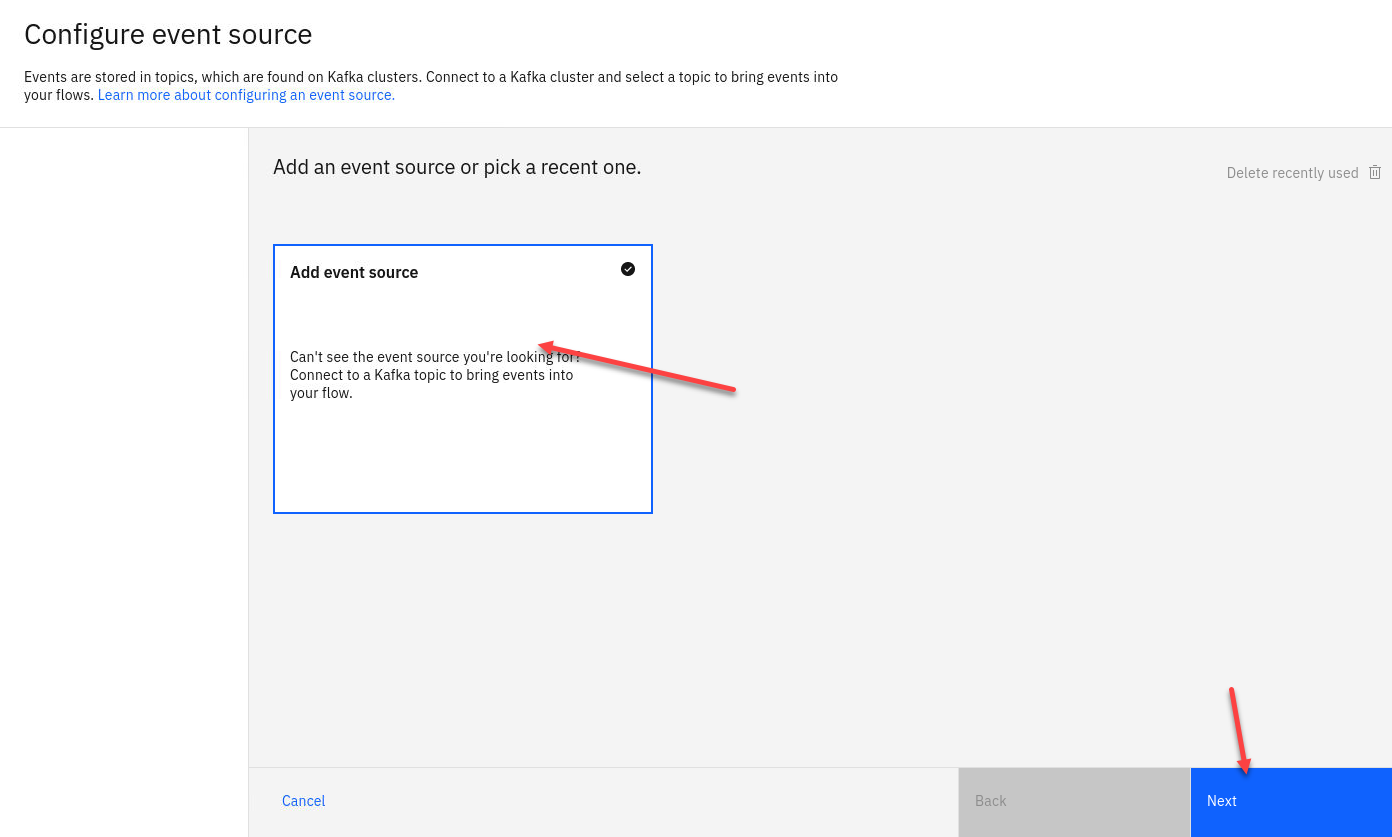
You will now configure the event source. First step is to select Add evnet source
Then click Next
-
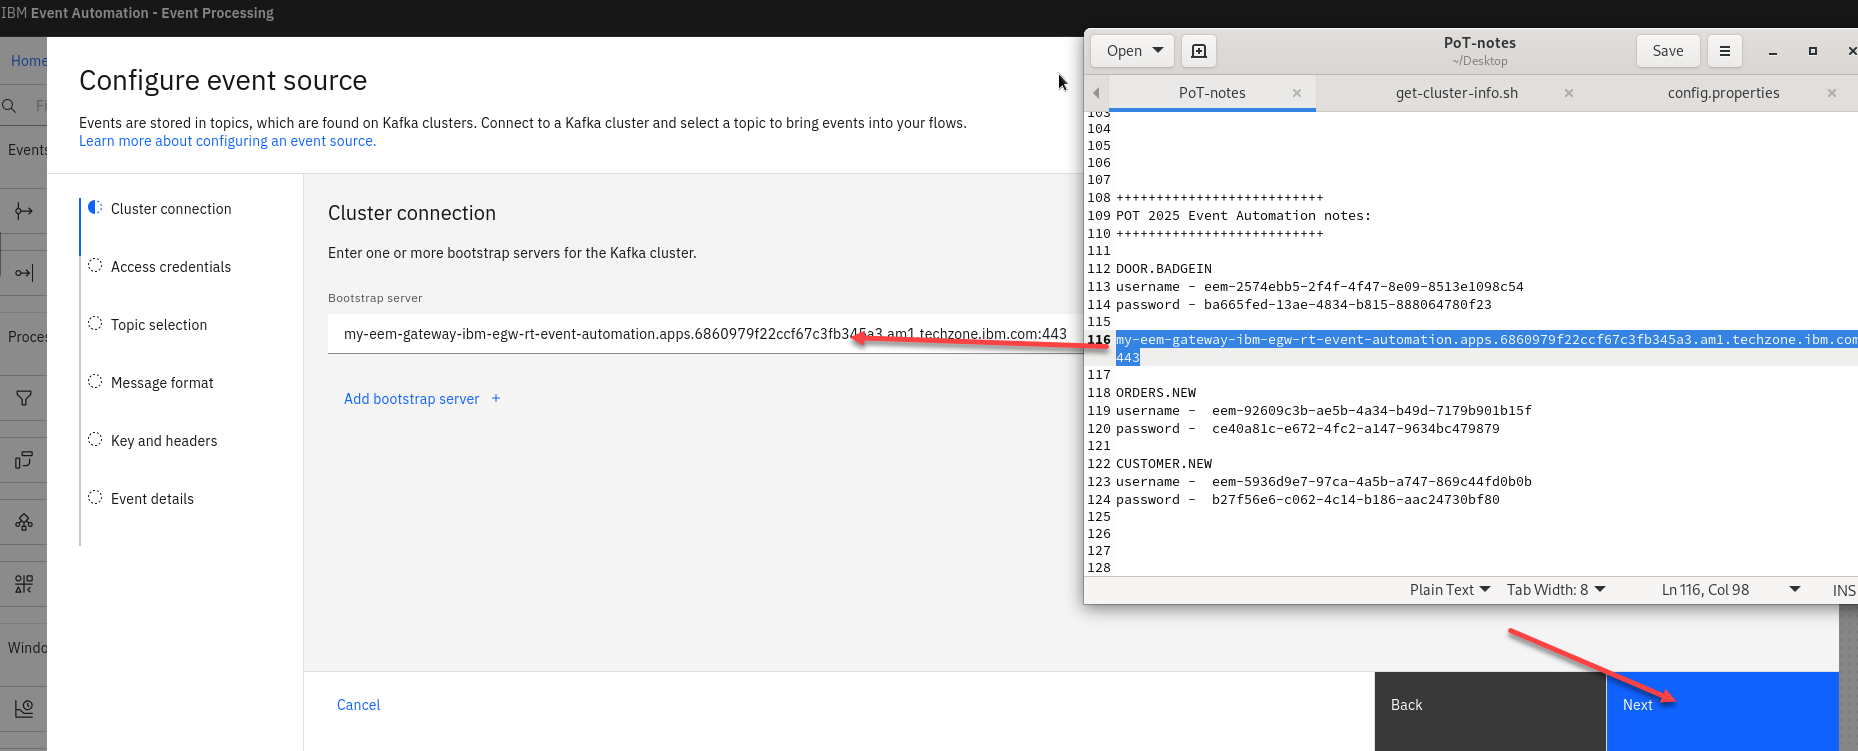
First step is to connect to the kafka gateway that you saved in your PoT-notes Then click Next
-
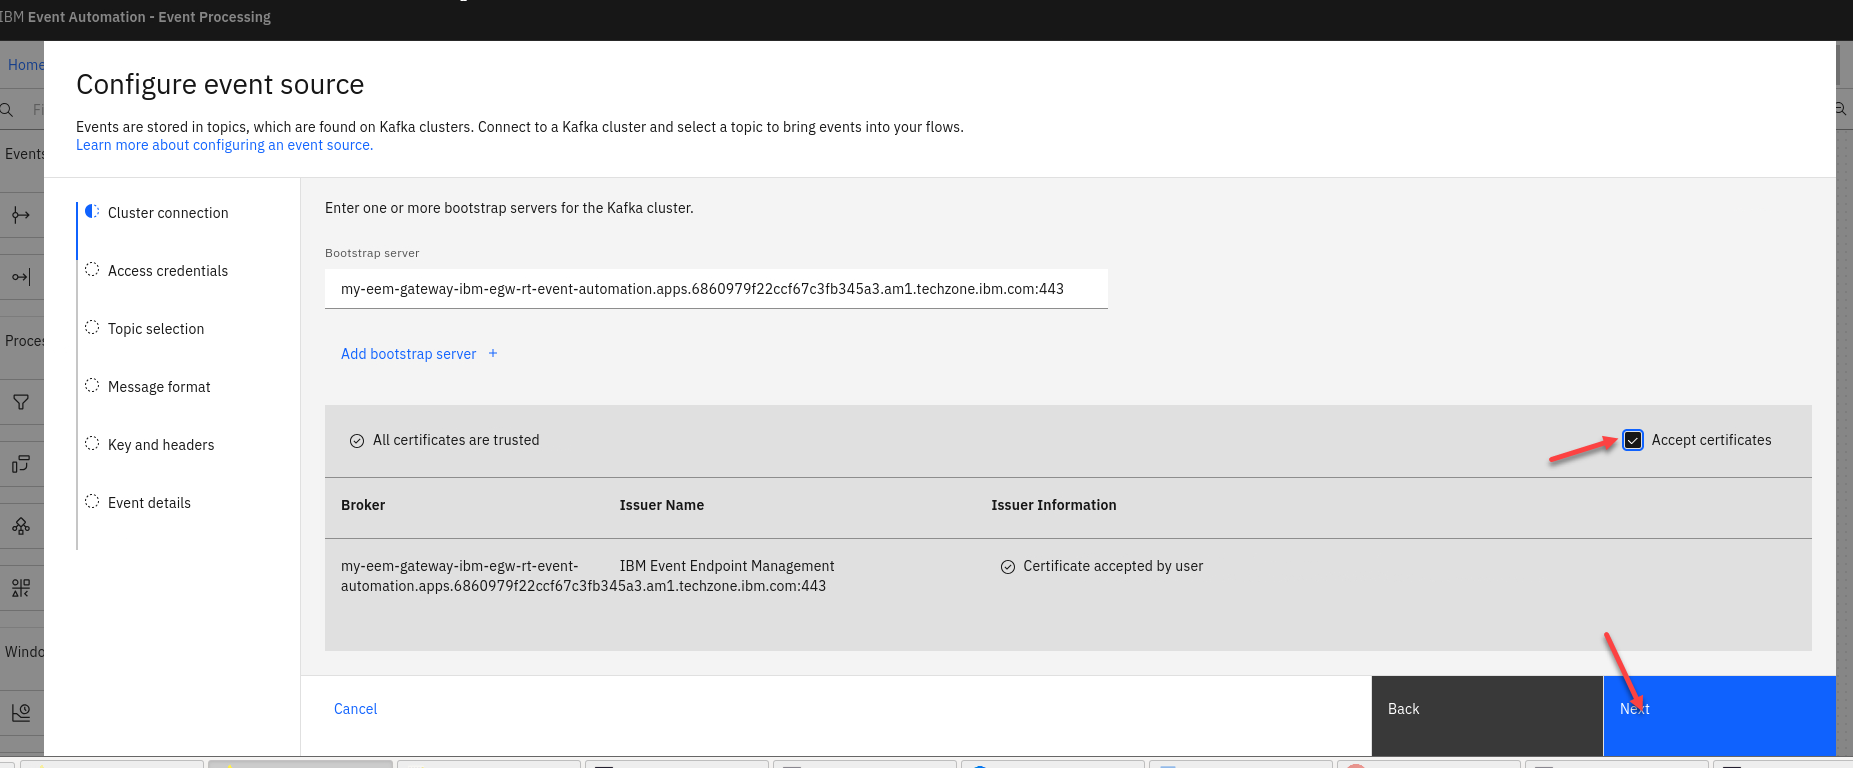
Next we will click on Accept certificates and then click on Next
-
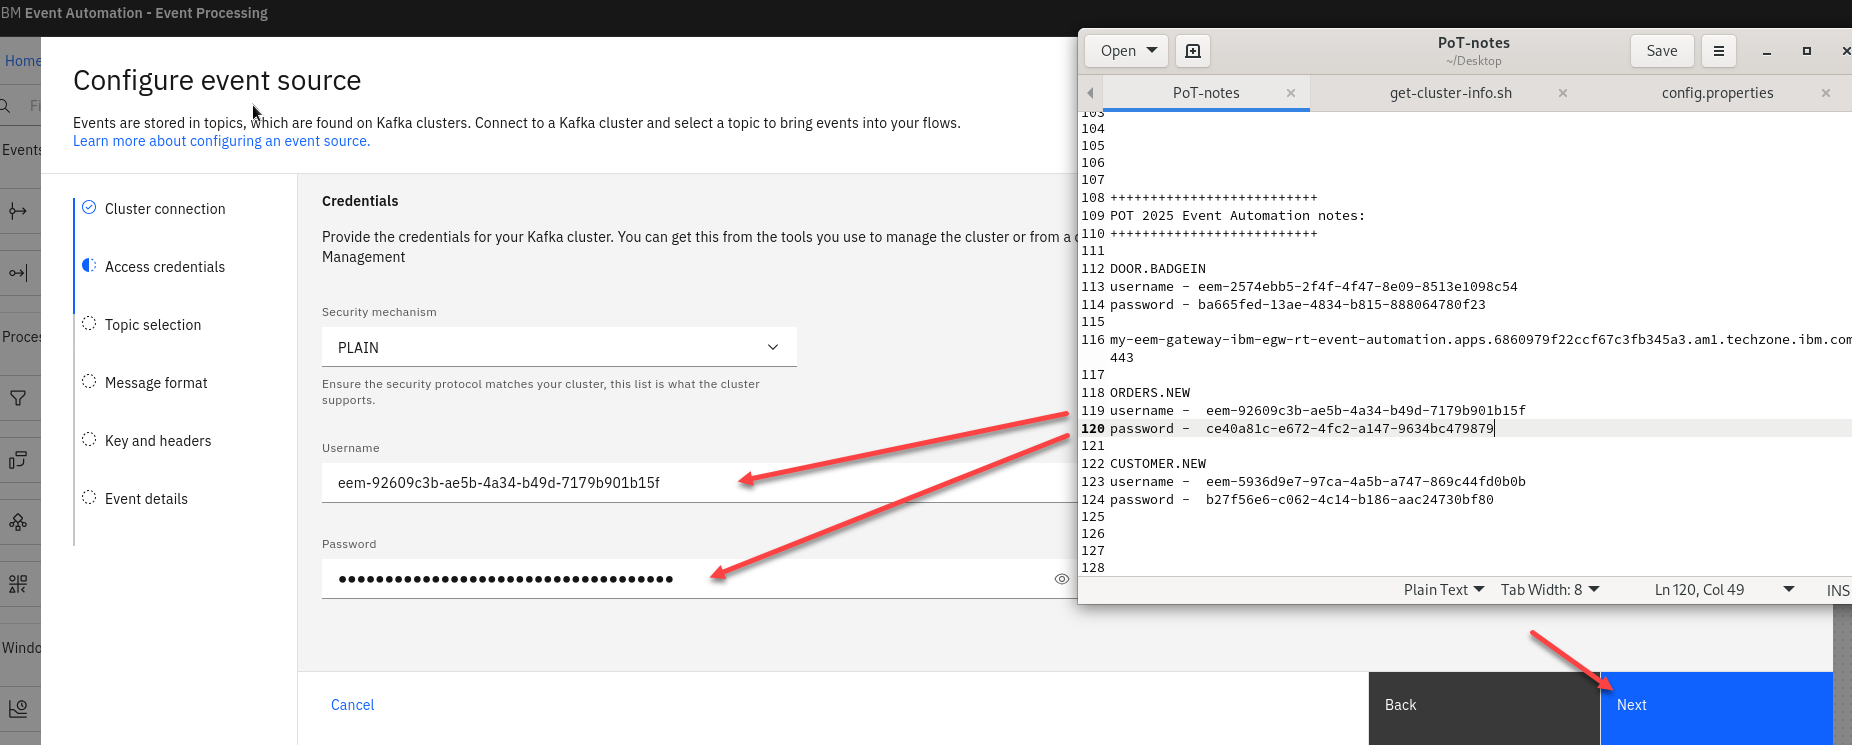
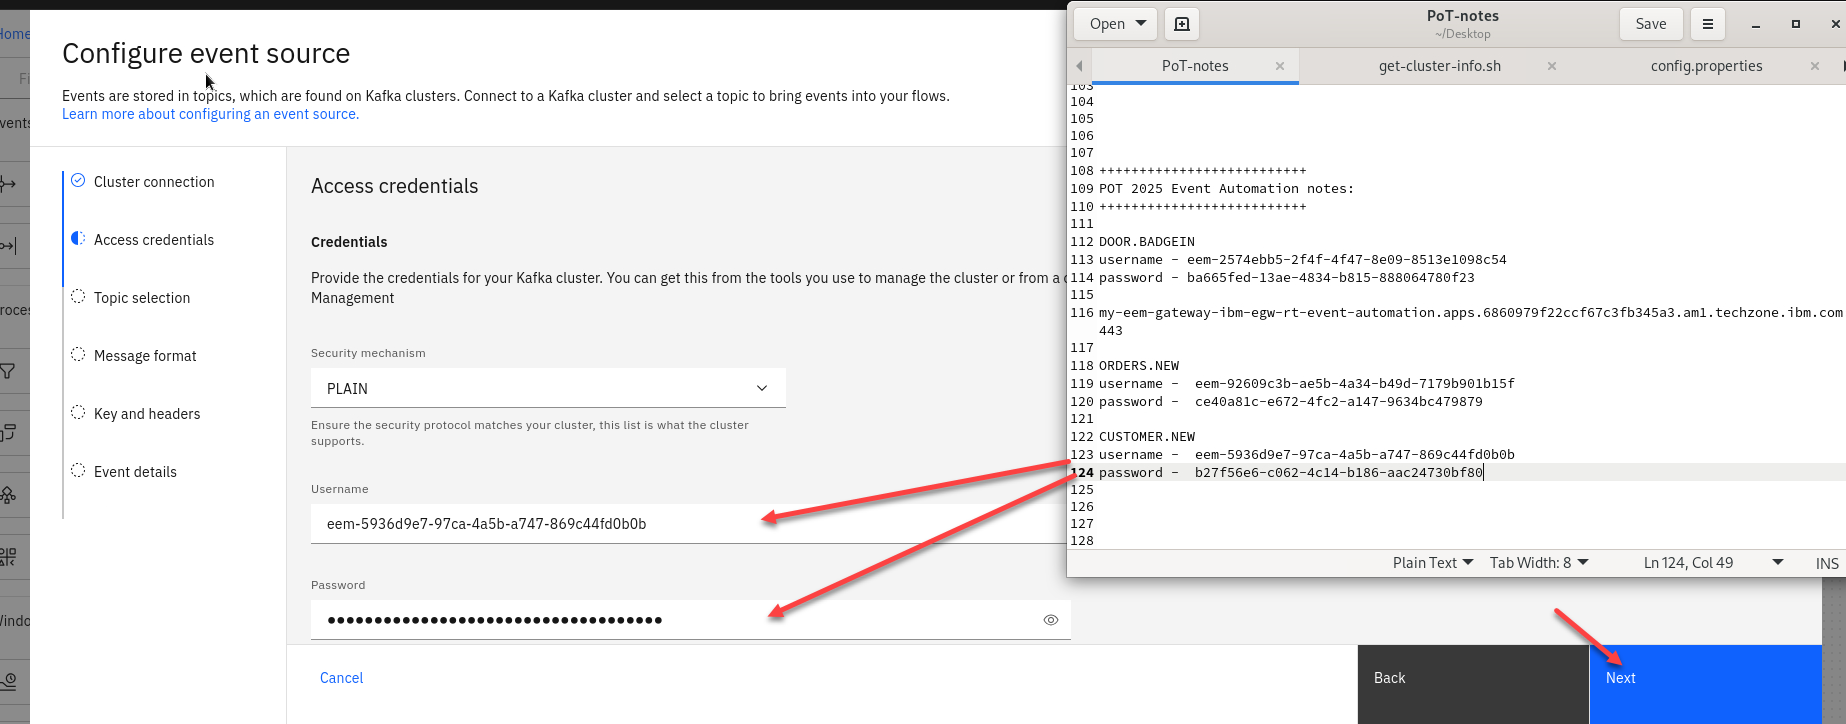
Now we will add the access credentials we saved for the ORDERS.NEW topic.
Then click Next
-
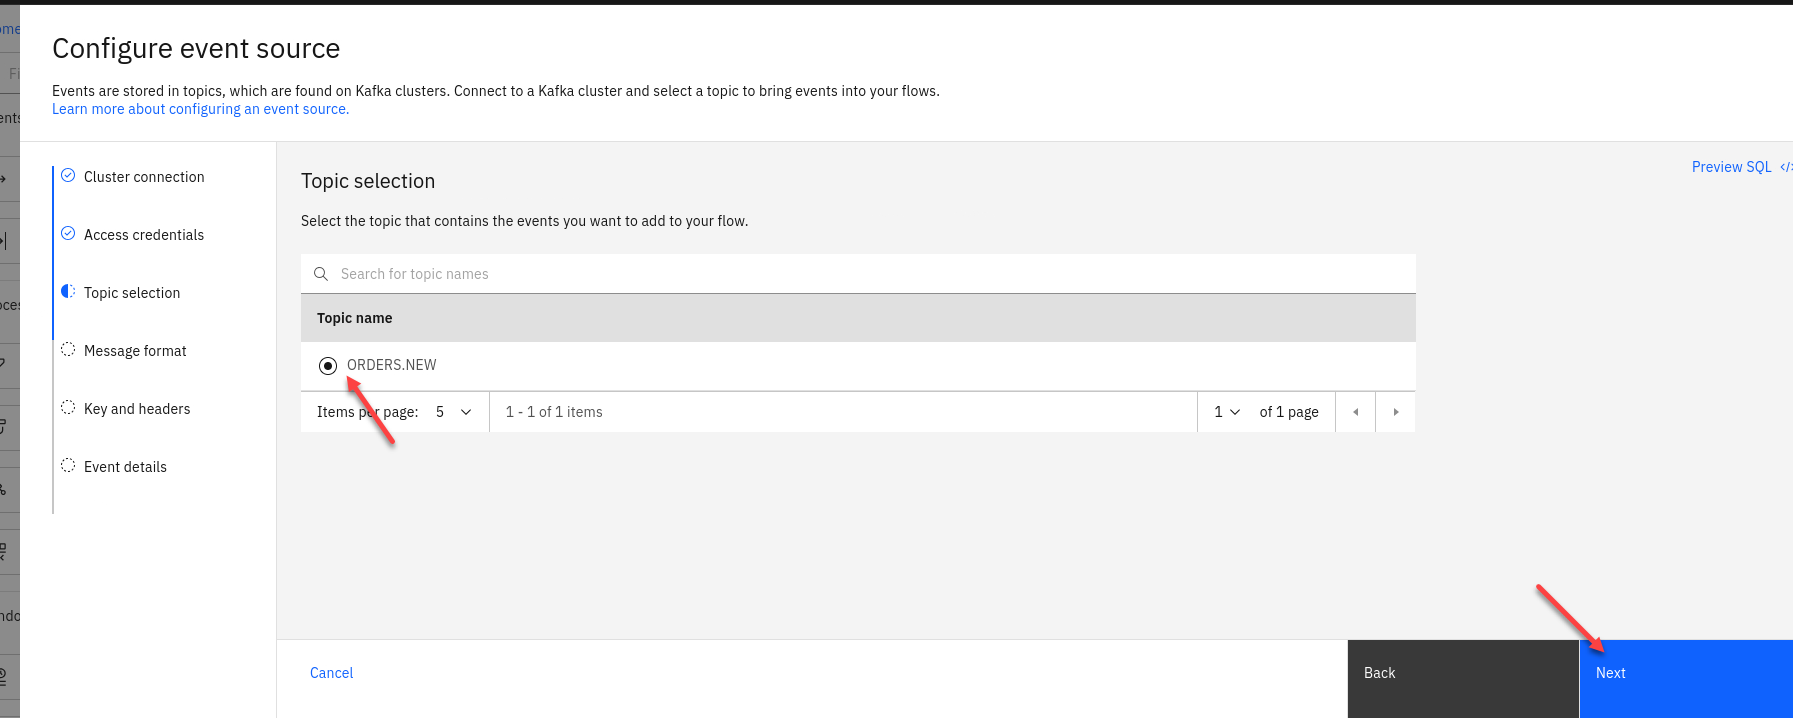
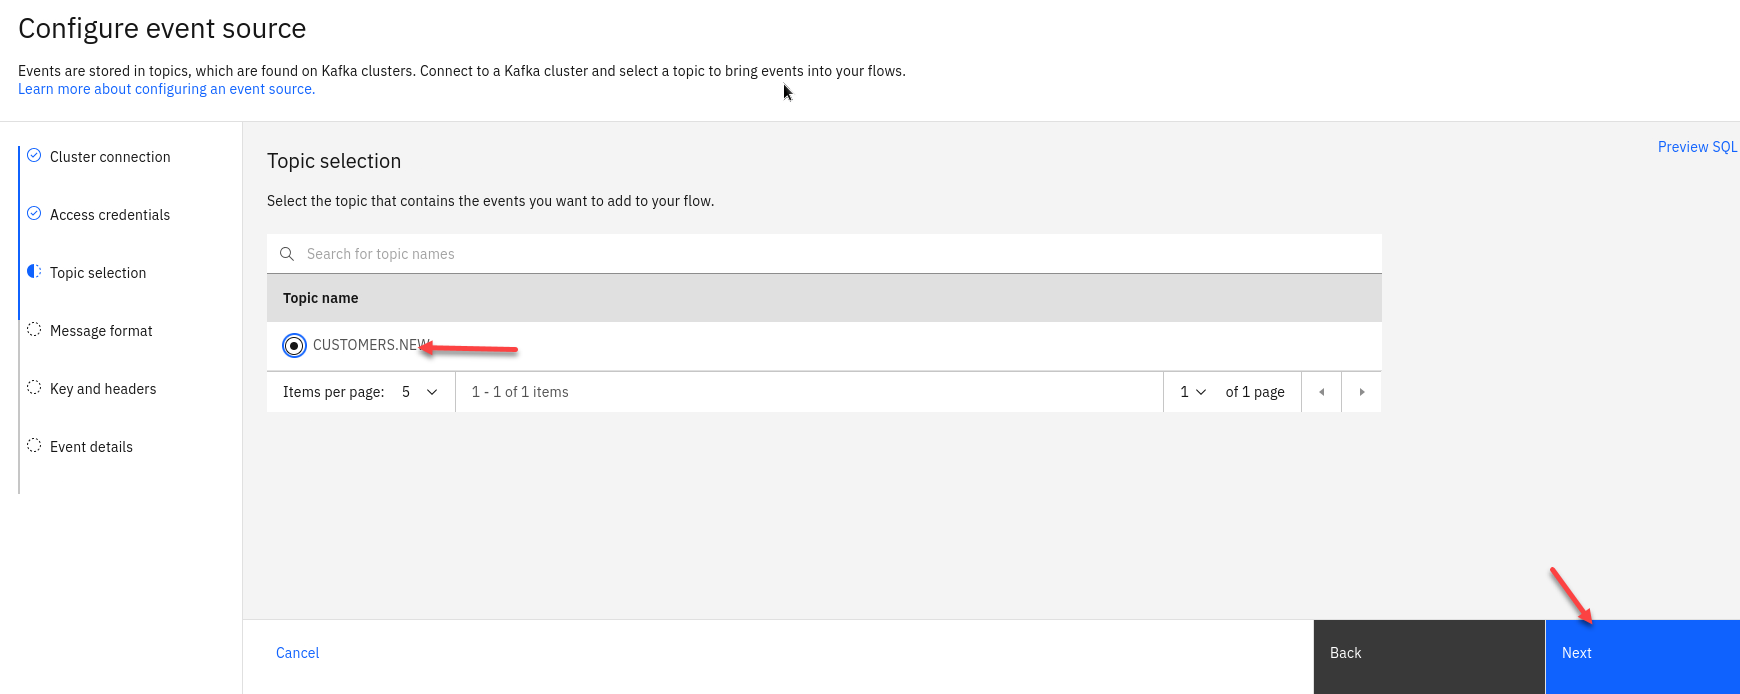
You should now for the Topic Selection see ORDERS.NEW. Select that one and click Next
-
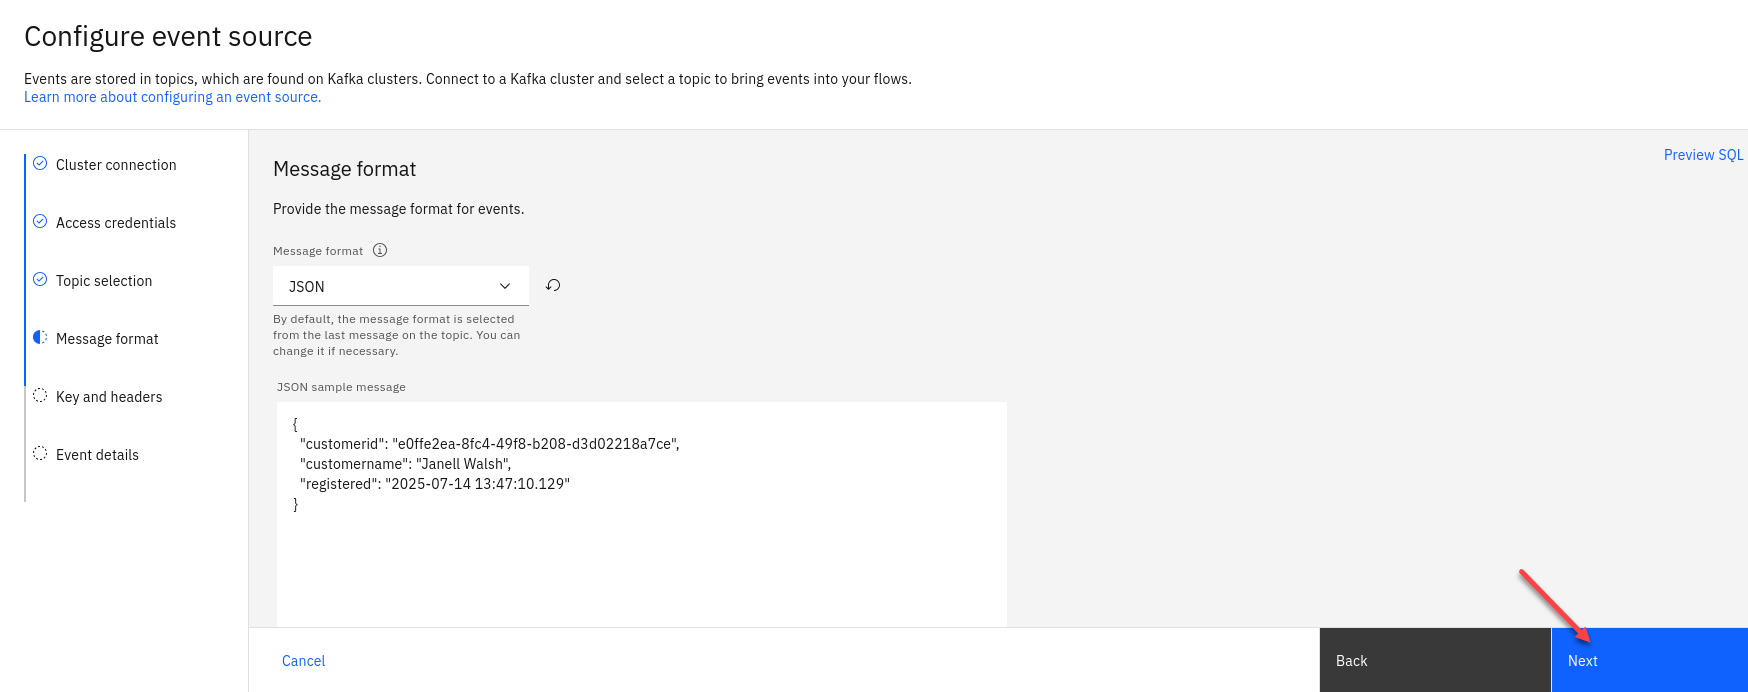
The next screen you can review the *Message format and then click Next

-
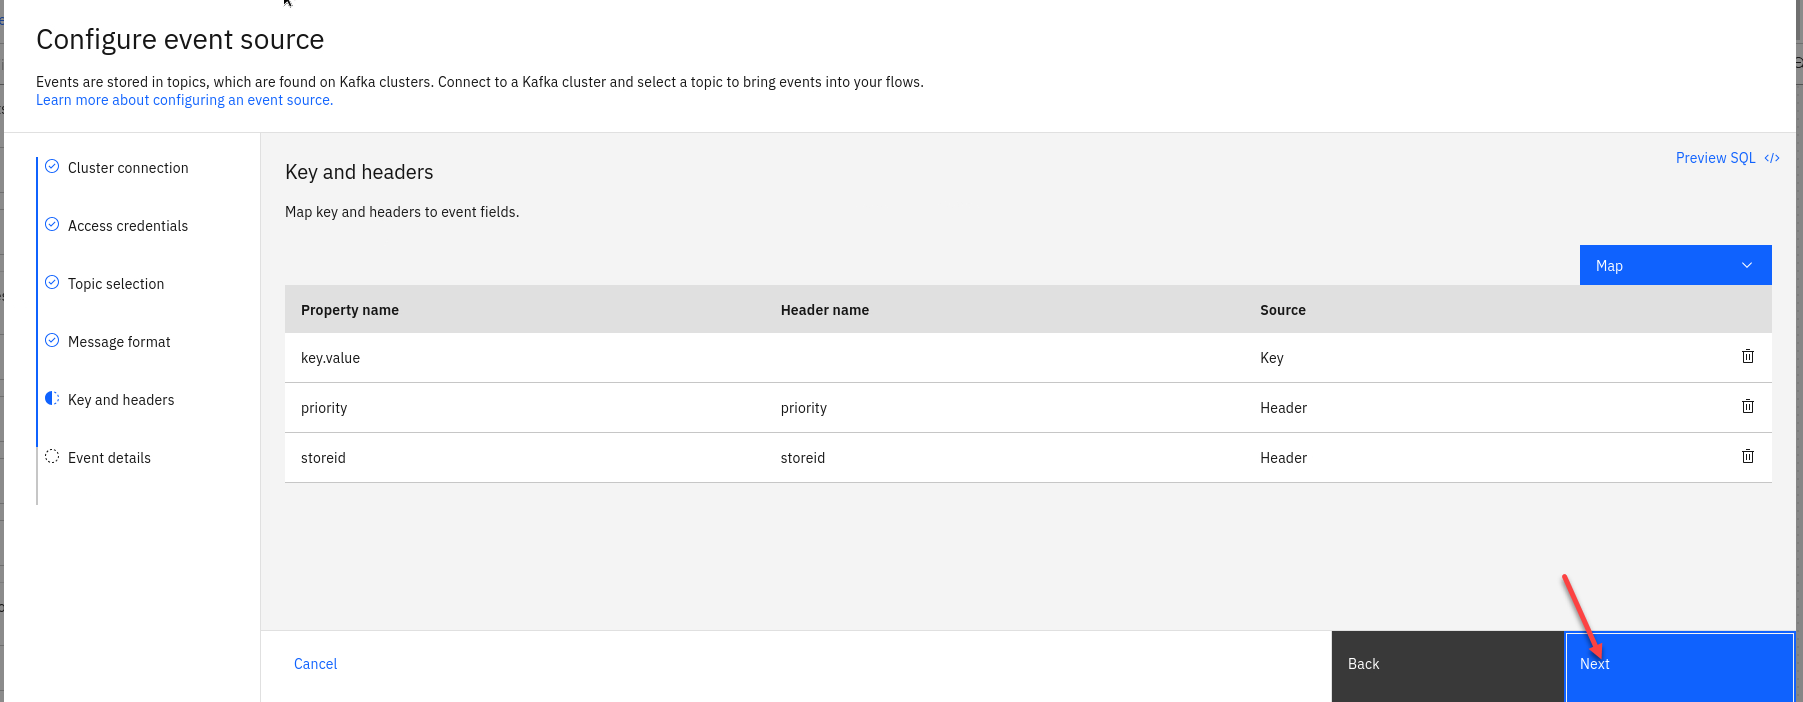
The next screen we will not map any key or header fields so just click Next
-
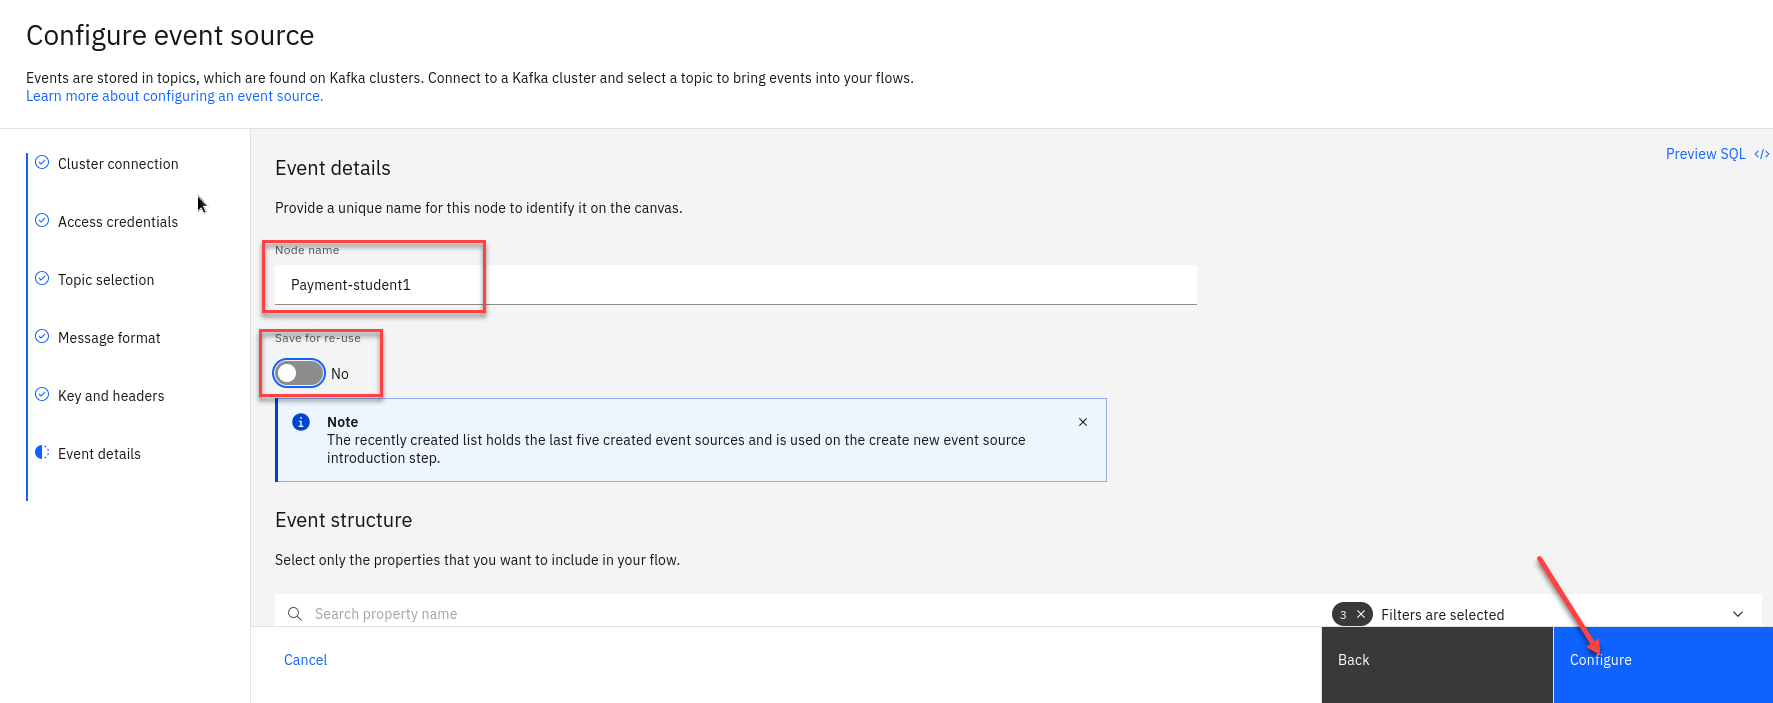
The last step is to name the Node to describe the stream of events and included your userid for ex: Payment-student1
Also turn off the Save for re-use and then click on Configure
-
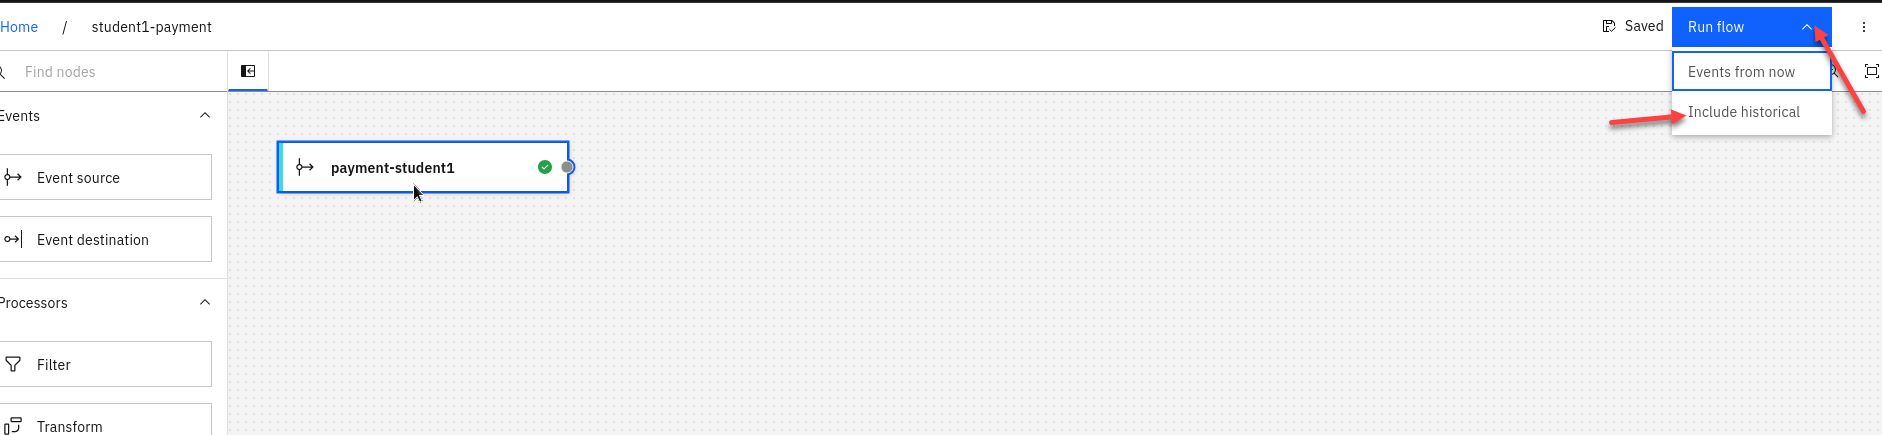
Now let’s do a quick test to make sure are Source Connector can receive messages. Click on the Run in upper right corner and select Include historical.
-
Once the Flink task starts you will start to see messages displayed.
Click stop in the upper right corner to stop it.

1.2.3 Event Automation Processing filtering
When processing events, we can use filter operations to select a subset that we want to use. Filtering works on individual events in the stream.
-
Create a Filter node and link it to your event source. Create a filter node by dragging one onto the canvas. You can find this in the “Processors” section of the left panel. Click and drag from the small gray dot on the event source to the matching dot on the filter node. Hover over the node and select the pen icon to edit the flow.
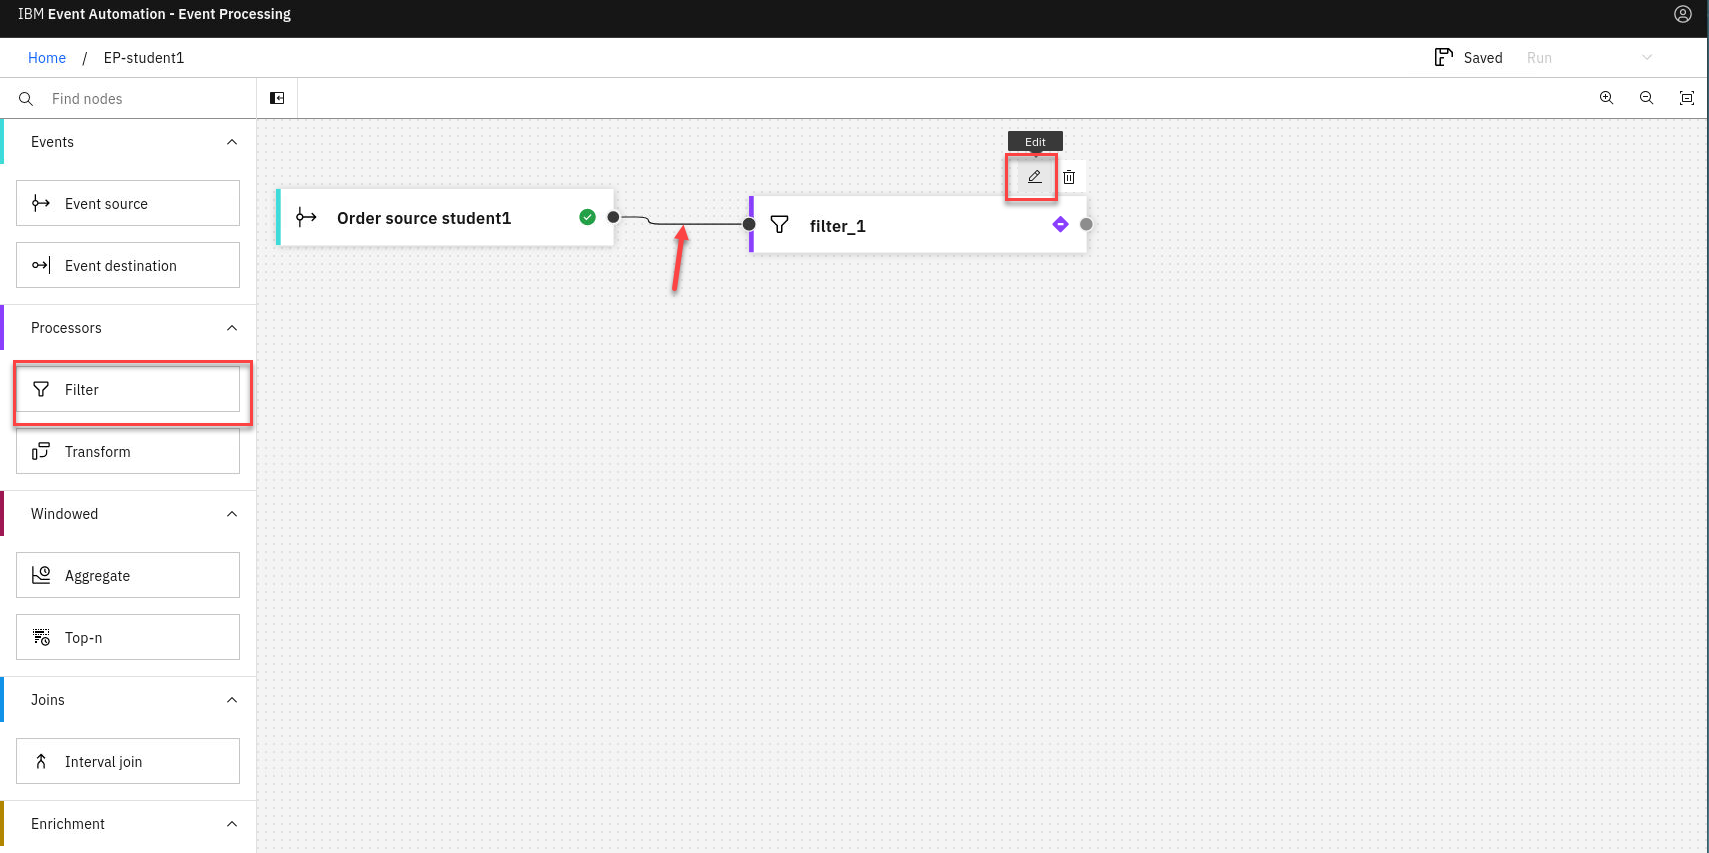
Note: You can add a node onto the canvas and automatically connect it to the last node added by double-clicking it in the palette.
-
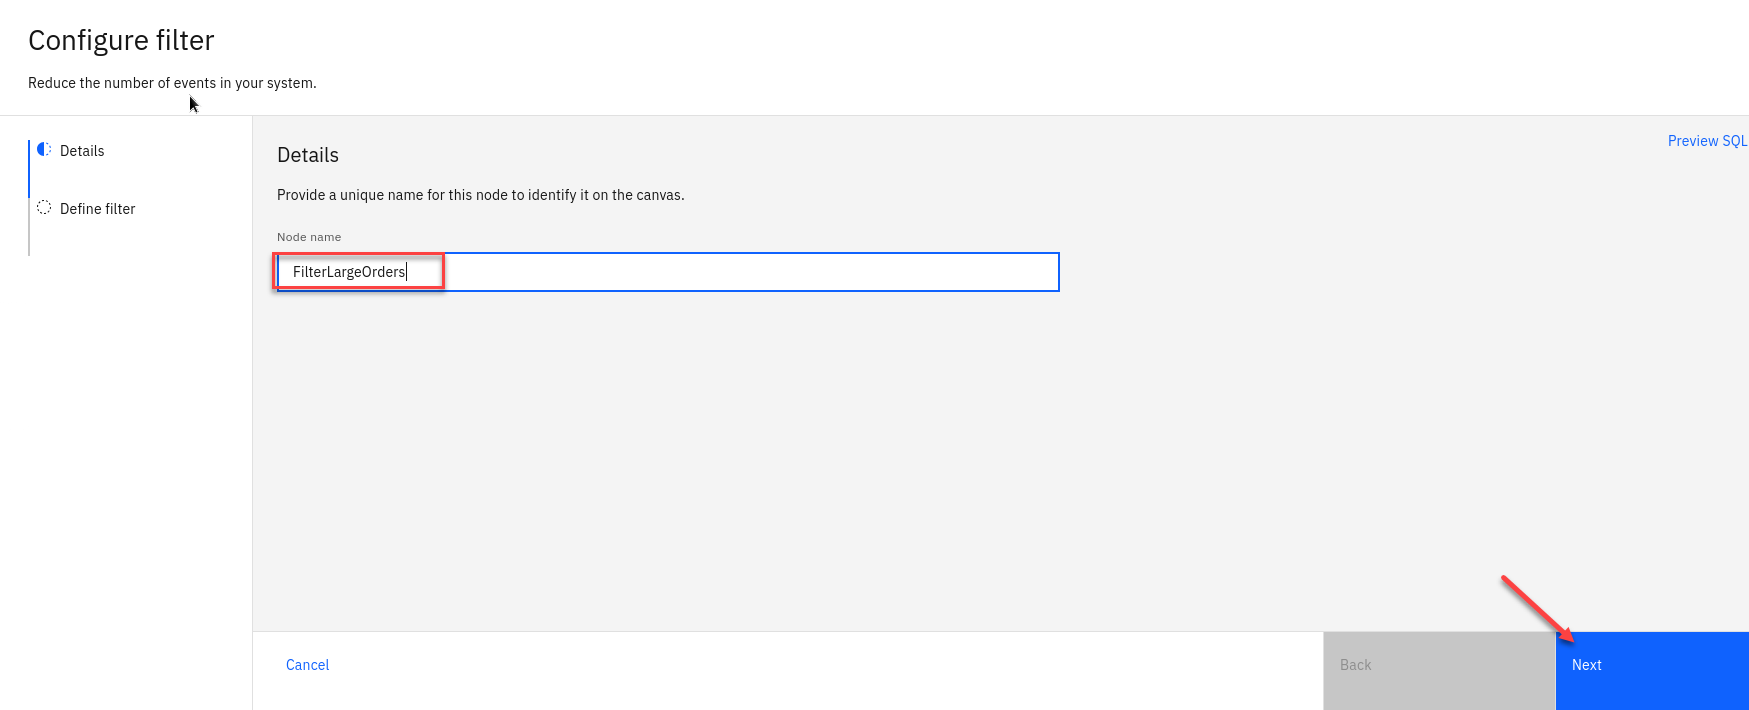
Give the filter node a name that describes the events it should identify: NA orders
Click Next
-
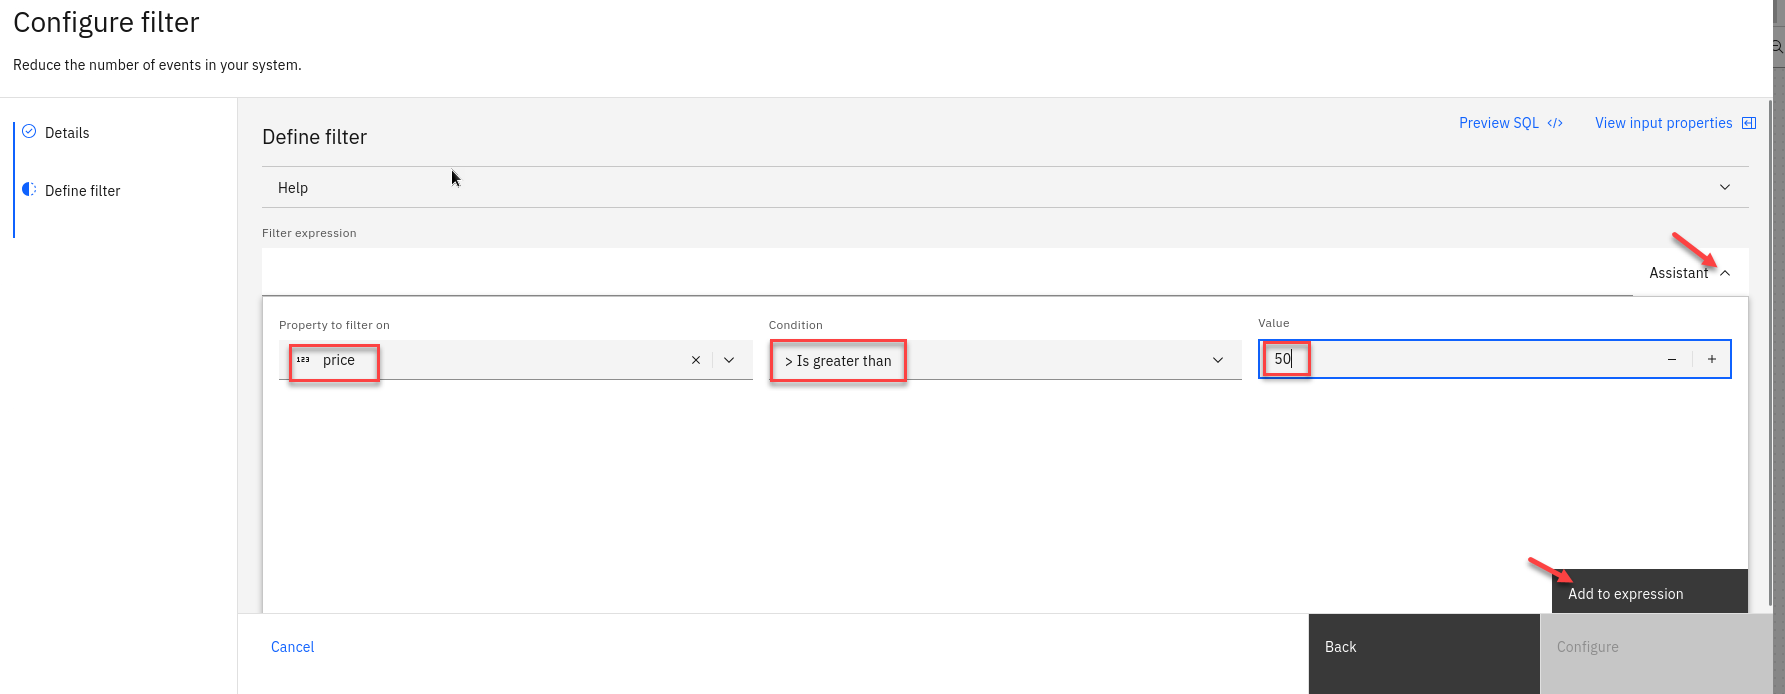
Use the assistant to define a filter that matches events with:
region = NA
Use the drop down for the property and conditon and type in NA.
Click “Add to expression”.
-
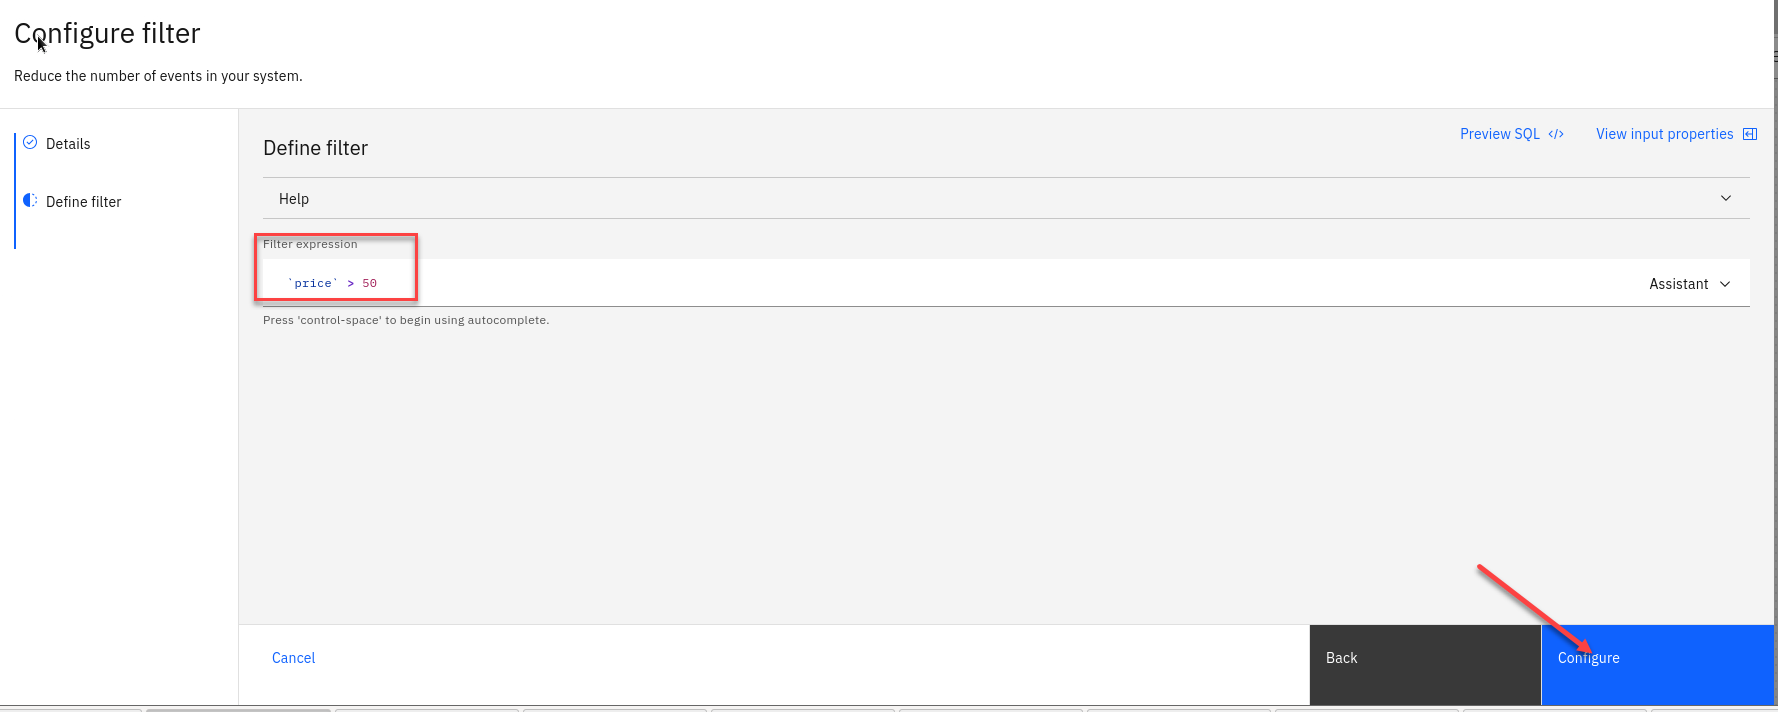
You will now see your new expression.
Click “Configure”.
1.2.4 Configure the Customer new event source node
-
We will now add a new Event source to the canvas. To configure the event source node hover over the node and select the pen icon.
-
You will now configure the event source. First step is to select Add evnet source
Then click Next
-
First step is to connect to the kafka gateway that you saved in your PoT-notes Then click Next
-
Next we will click on Accept certificates and then click on Next
-
Now we will add the access credentials we saved for the CUSTOMER.NEW topic.
Then click Next
-
You should now for the Topic Selection see CUSTOMER.NEW. Select that one and click Next
-
The next screen you can review the *Message format and then click Next
-
The next screen we will not map any key or header fields so just click Next
-
The last step is to name the Node to describe the stream of events and included your userid for ex: New Customers
Also turn off the Save for re-use and then click on Configure
-
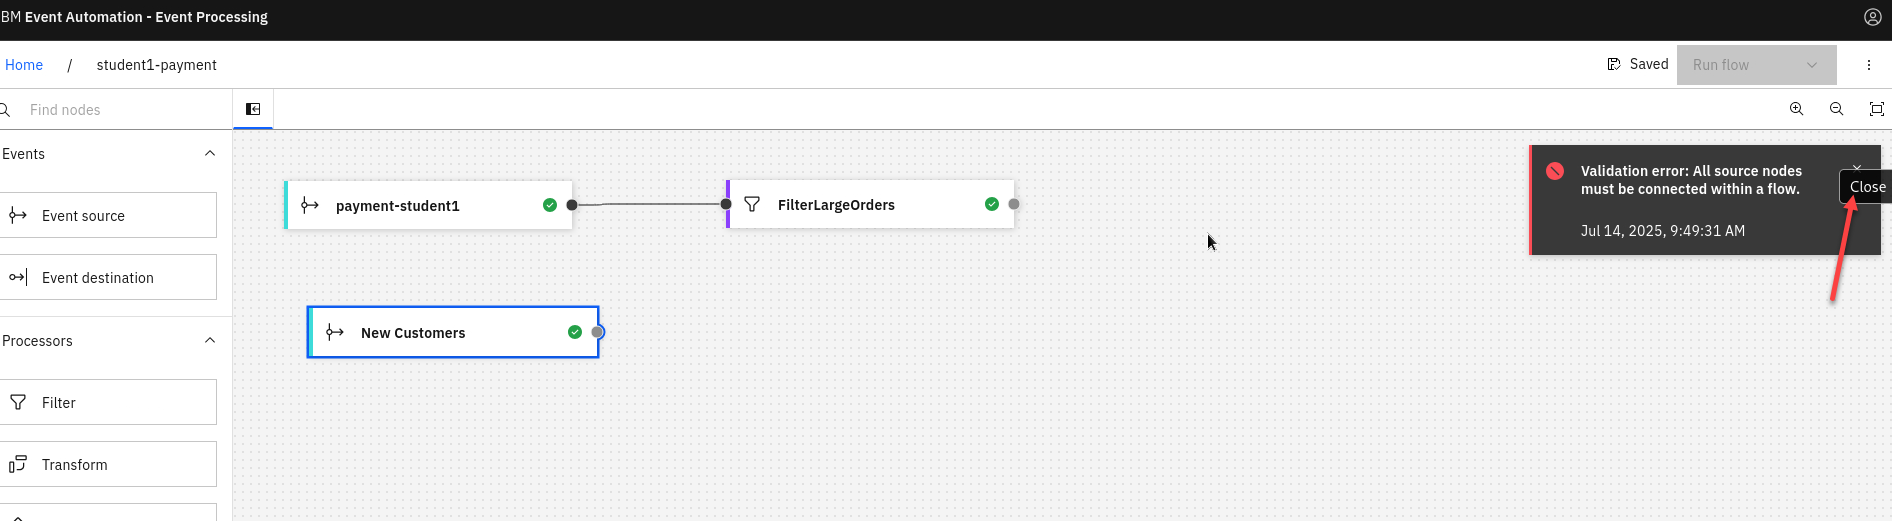
You now have the new source connector on the canvas. You will see the Validation error you can close. That is just saying that the Event nodes all need to be connected.
1.2.5 Configure an Interval join of two sources.
we now need to “JOIN” the filtered Order stream data to records of New Customers in order to correctly identify first-time purchasers that placed an order for over $50 USD in the last 24 hours.
-
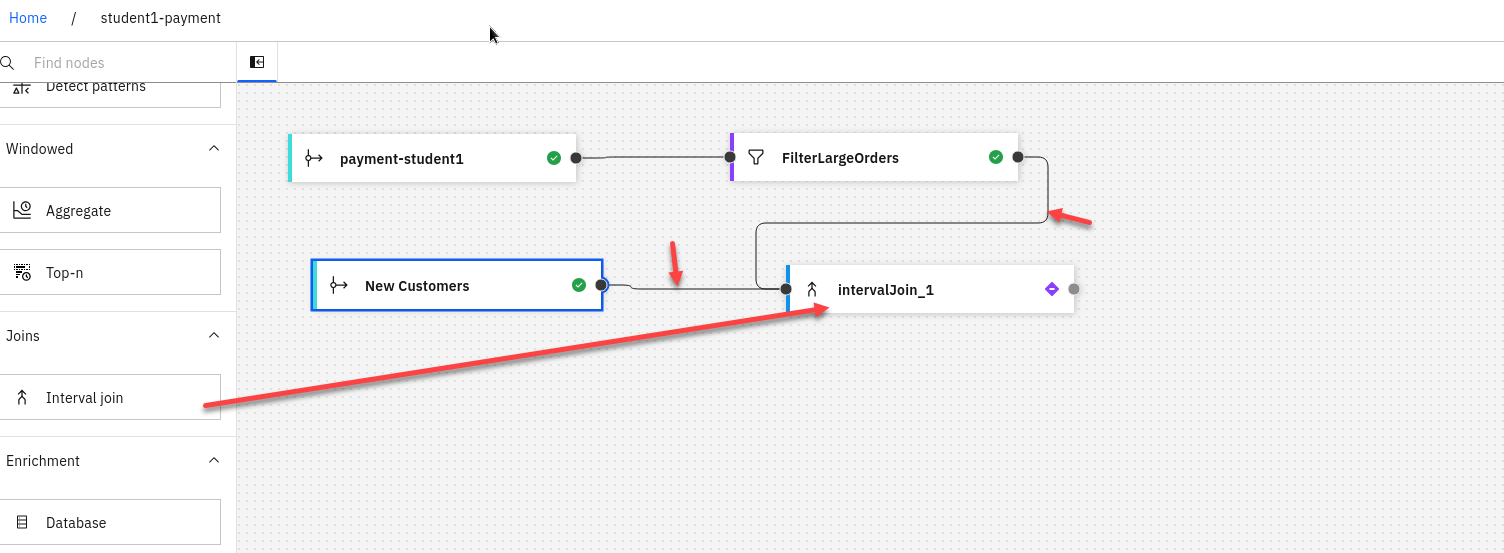
Back on the canvas for studentX-payment flow, scroll down along the left-hand interface until you locate the Interval Join node. Drag and drop this node to the far right-hand edge of the authoring canvas.
We will then connect the FilterLargeOrders and the New Customers nodes to the IntervalJoin node. With your cursor, hover over the intervalJoin_1 node and click the Edit (pencil) icon.
-
The Details tab, set Node name equal to DetectNewCustomerLargeOrders.
Click Next

-
The next screen activate the expression builder by click the Assistant dropdown menu. Set the following properties:
• Specify property from New Customers: customerid
• Specify property from FilterLargeOrders: customerid
When ready, click Add to expression.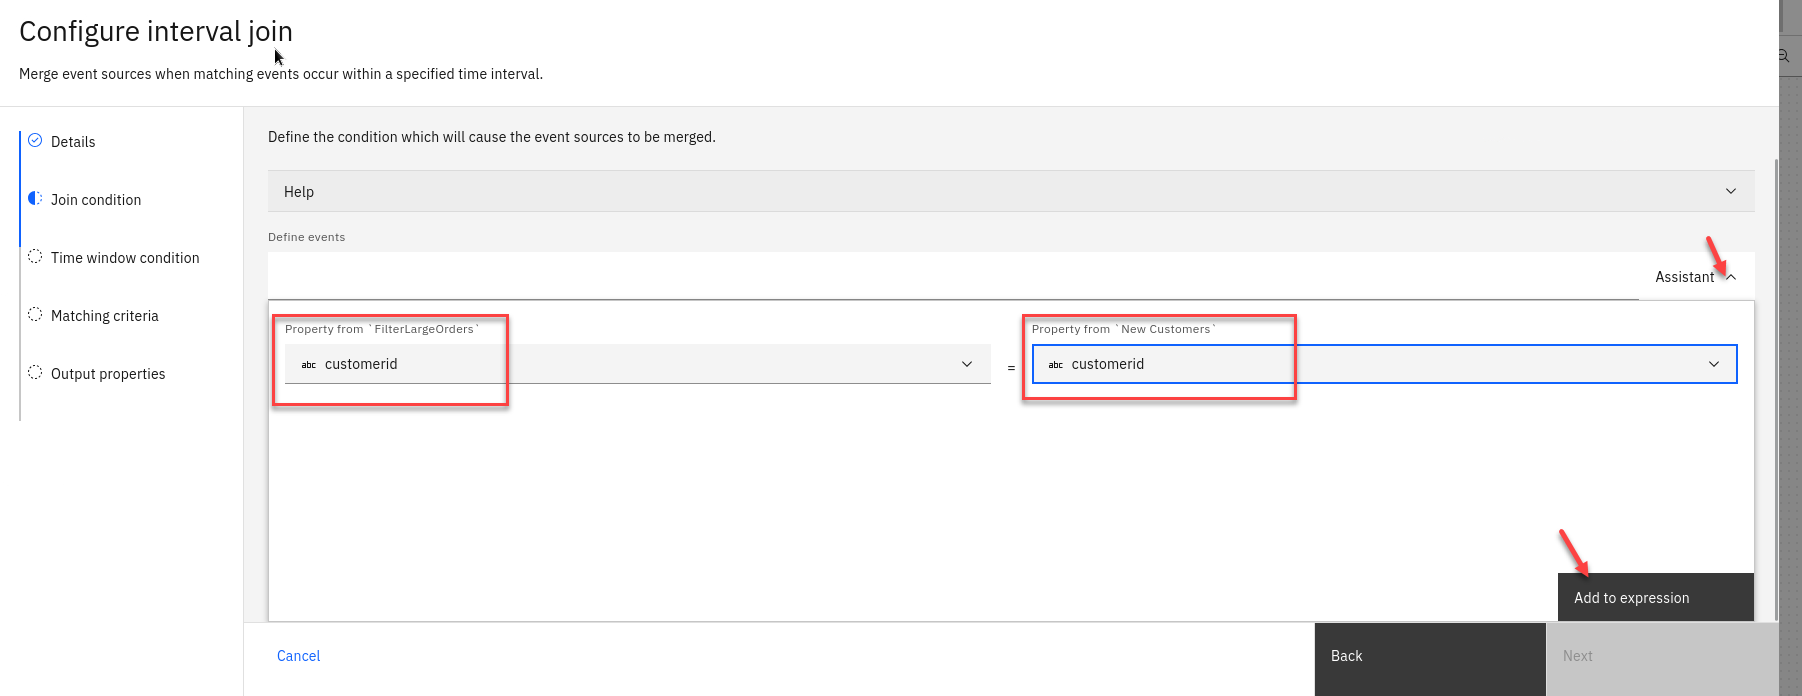
-
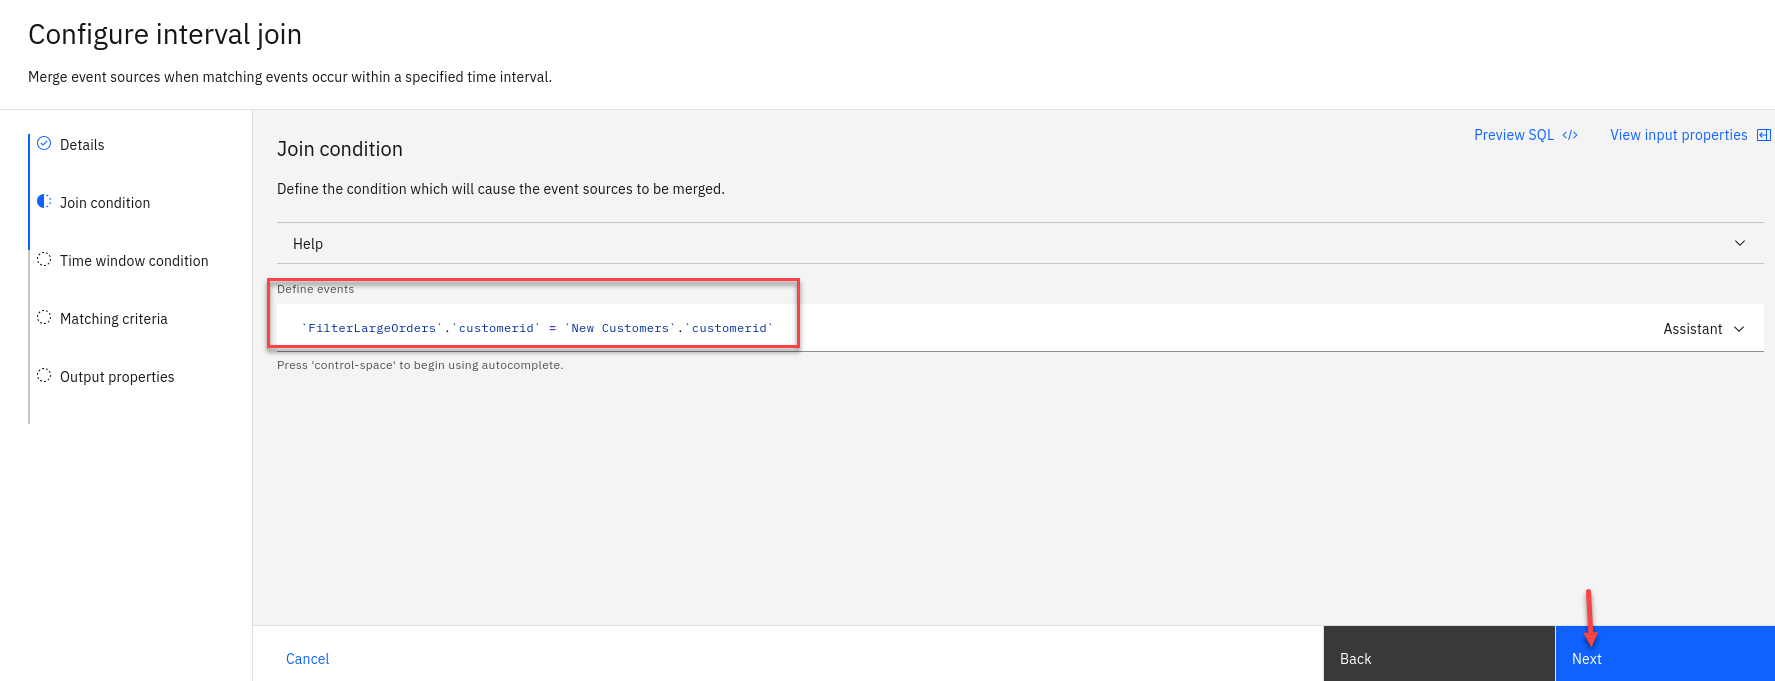
The syntactically correct JOIN expression will be expressed under the Define events field: ‘New Customers’.’customerid’ = ‘FilterLargeOrders’.’customerid’. After you have reviewed the JOIN condition, click Next.
-
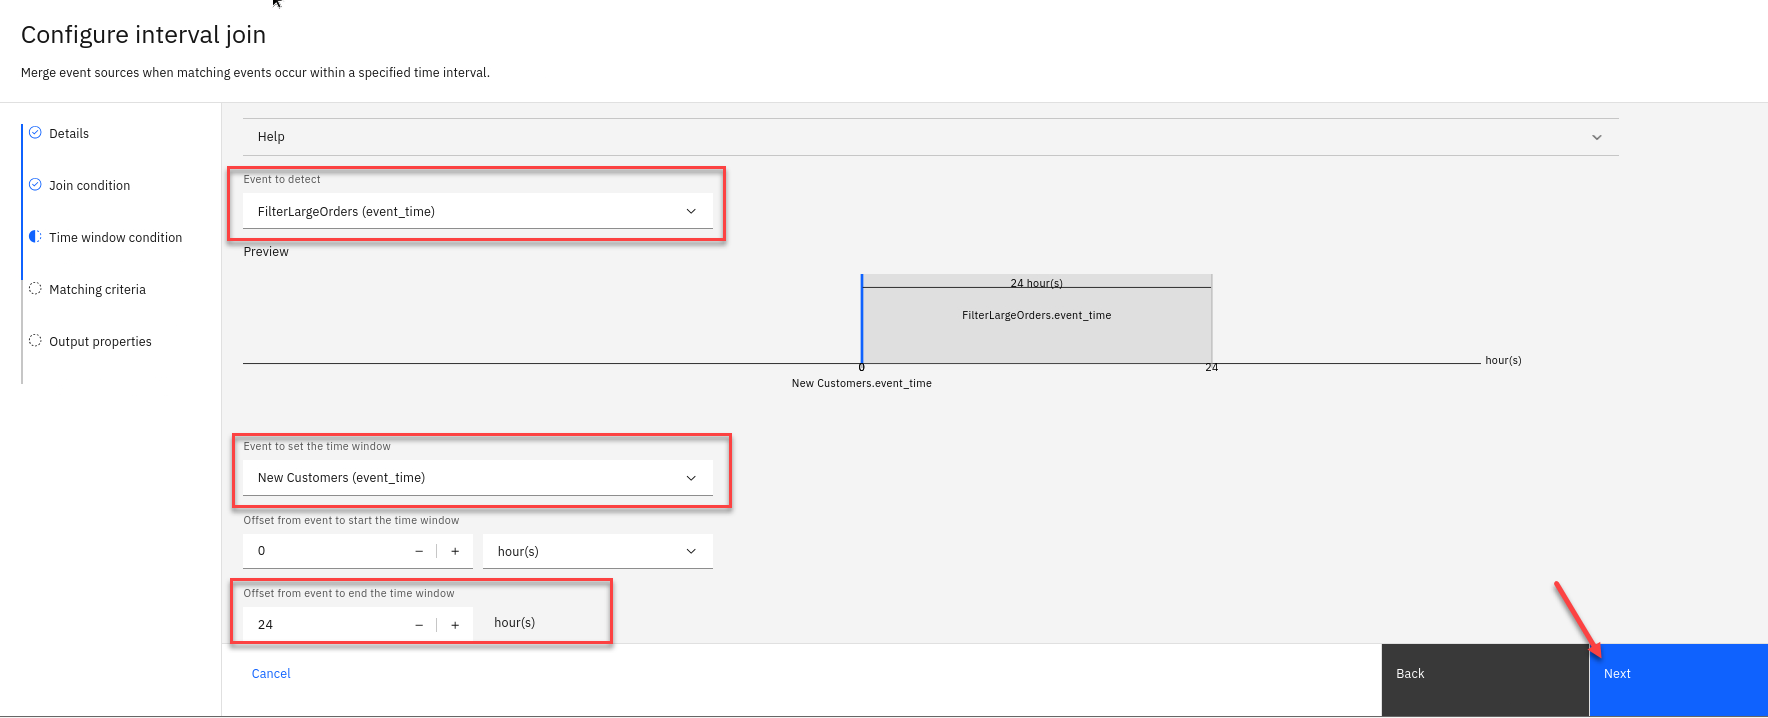
Under the Time window condition, you can define the time interval “window” where detected events are considered viable. To meet the criteria, a purchase of over $50 USD must be made by a first-time customer within a 24 hour window of creating an account.
• Look for the Event to detect field and select the FilterLargeOrders (event_time) option from the drop-down menu.
• Event to set the time window: New Customers (event-time) (B).
• Offset from event to end the time window: 24 HOUR(S) (D)
Click Next
-
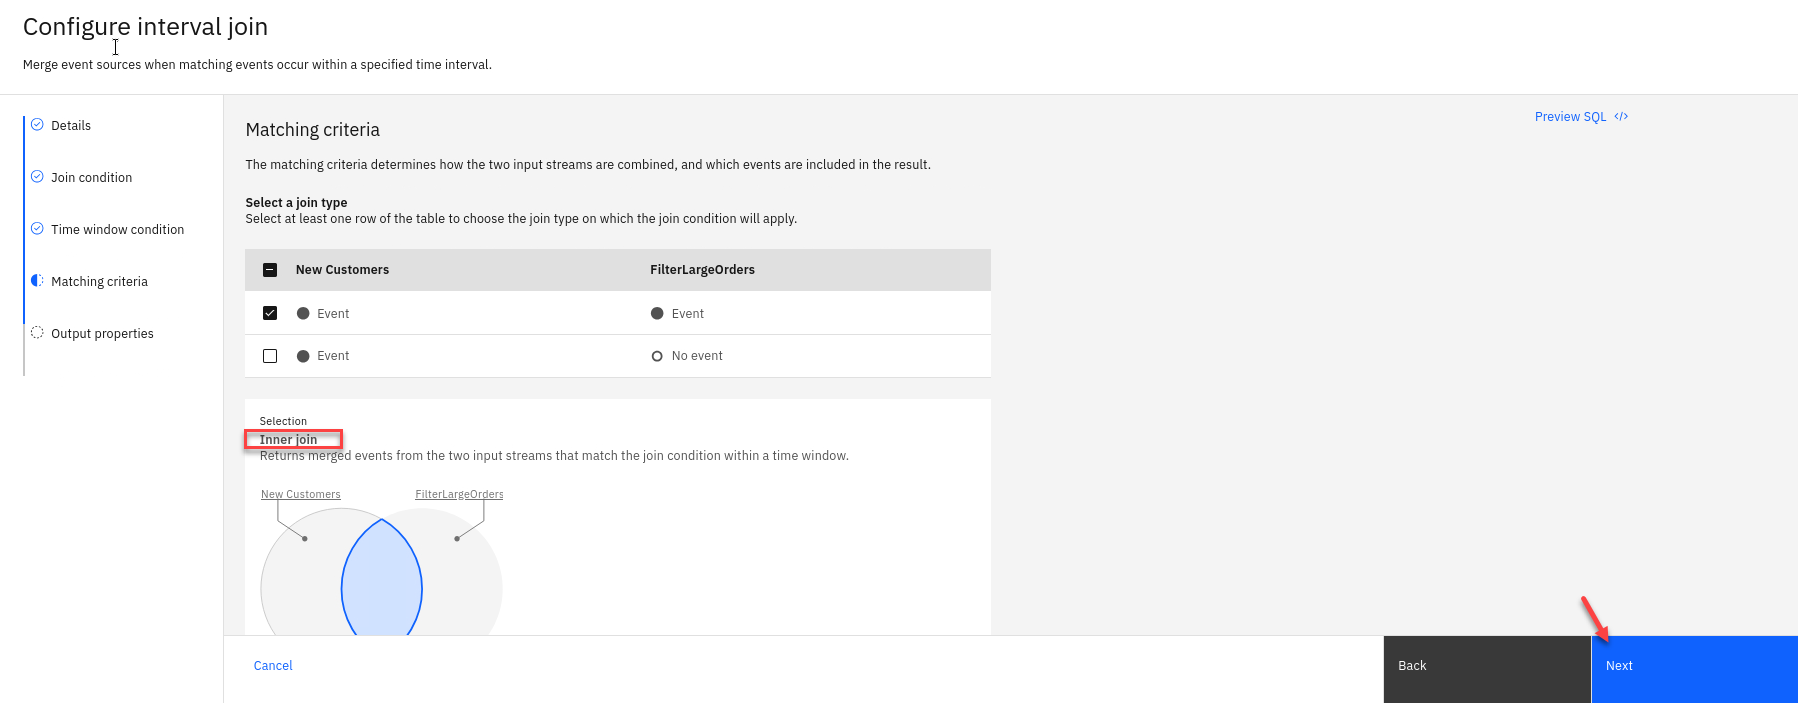
Next you will see the matching interval join.
click Next
-
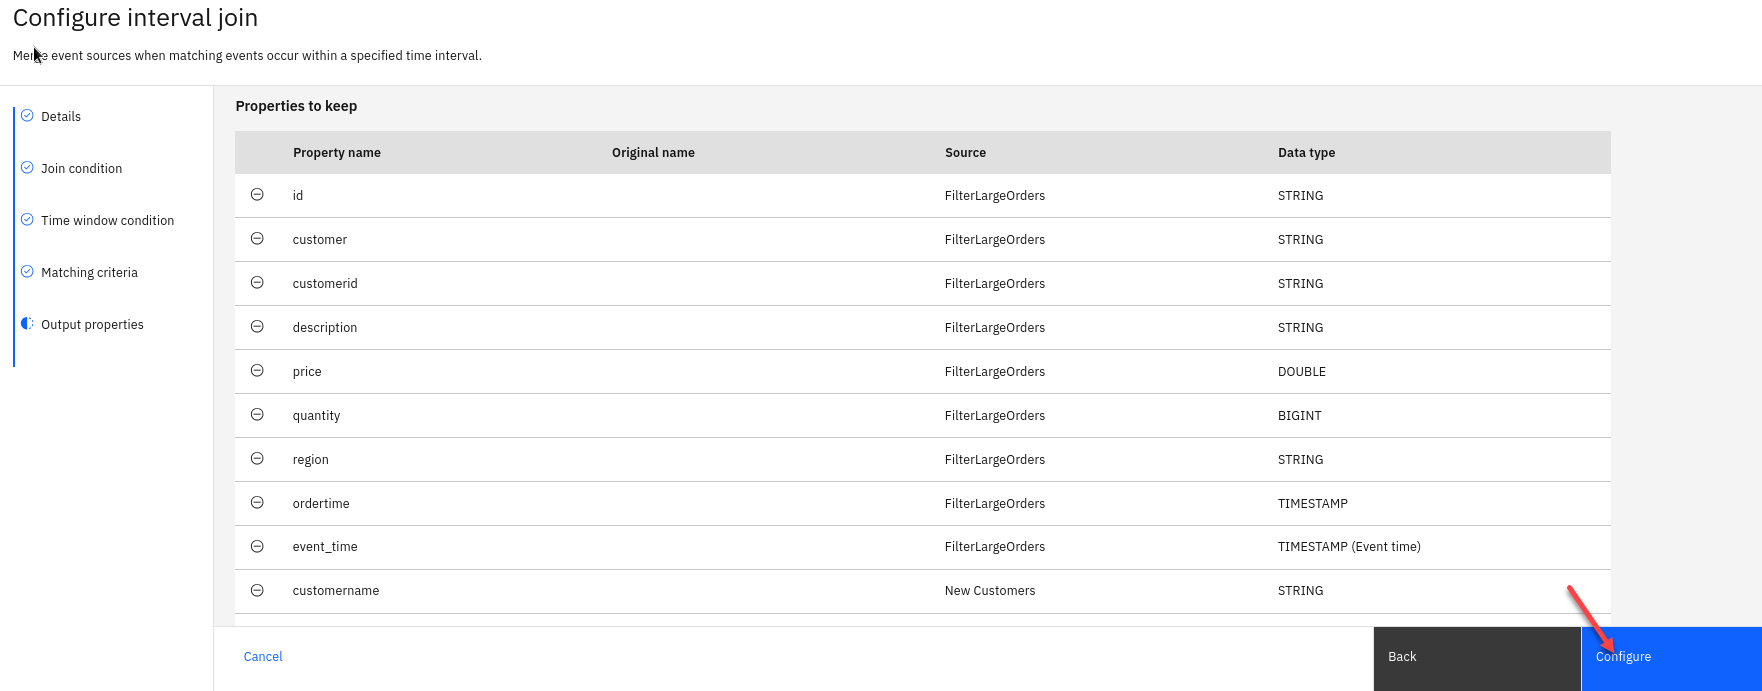
The JOIN node’s output will be a combination of fields from both the filtered Orders and New Customers events streams. Before finalizing the interval join, you need to clean up the output so that duplicate fields (like customerid and event_time) are not included from the JOIN operation.
Note: You have the option of renaming or removing the duplicate fields — but for the sake of this demonstration, you will be removing the fields.
Click the round - sign to the left of the first customerid row, where the Source is labelled as New Customers , to remove the duplicate
Delete the event_time row where the Source column is labelled as New Customers

-
You should now have no warnings.
Click Configure
1.2.5 Test current flow
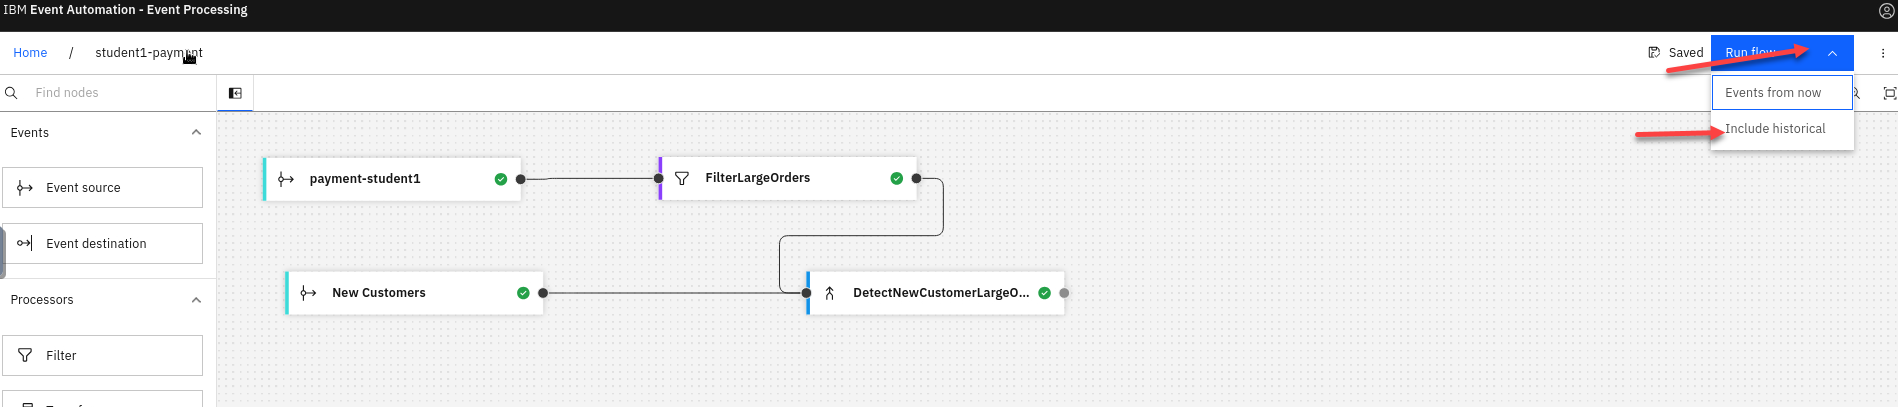
Now let’s do a quick test to make sure are flow is working correctly.
-
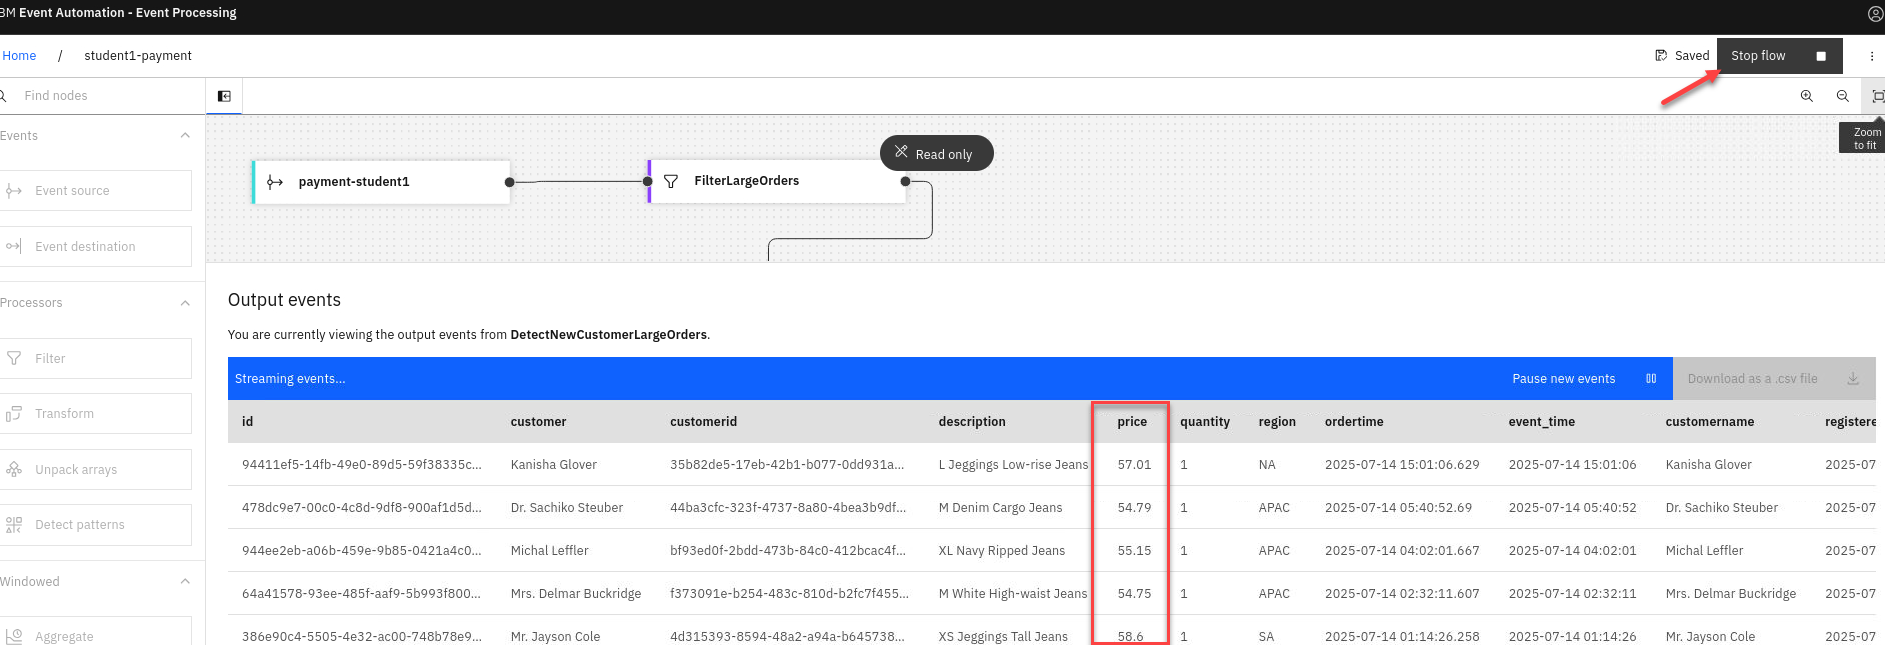
Click on the Run in upper right corner and select Include historical.
-
You should now see historical data and you should notice that the price is greater then $50 which is what we filtered the payment stream.
After reviewing make sure to stop the flow
1.2.6 Configure sink connector for new Kafka topic.
With a rich feed of filtered and processed event streams, which joins together New Customers and Orders data feeds, lets see about making that feed available to other teams to use. Marketing department can begin supplying their customer loyalty application with input. When new events are detected which match the marketing team’s promotional criteria, the application will automatically trigger an upsell activity for the new customer.
-
We will now login to the EEM screen. In the search bar enter eem
Right click on my-eem-manager and open in new tab.
-
Login to the EEM home page as eem-user and the password is passw0rd
-
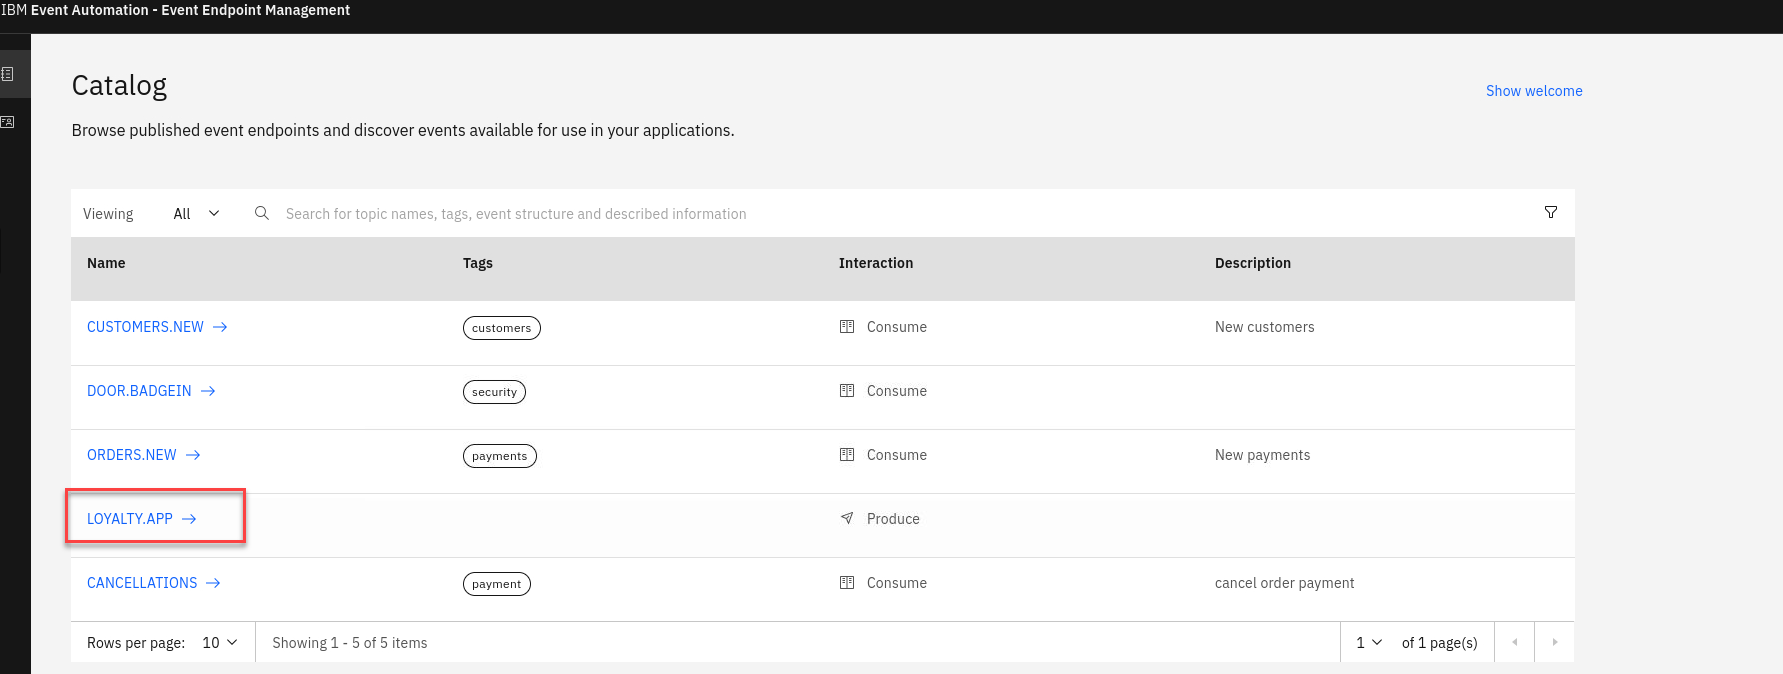
Go to the Event Endpoint Management catalog home page and find the LOYALTY.APP topic.
You will notice that as a user you will only have access to the Catolog page and Subscription page.
-
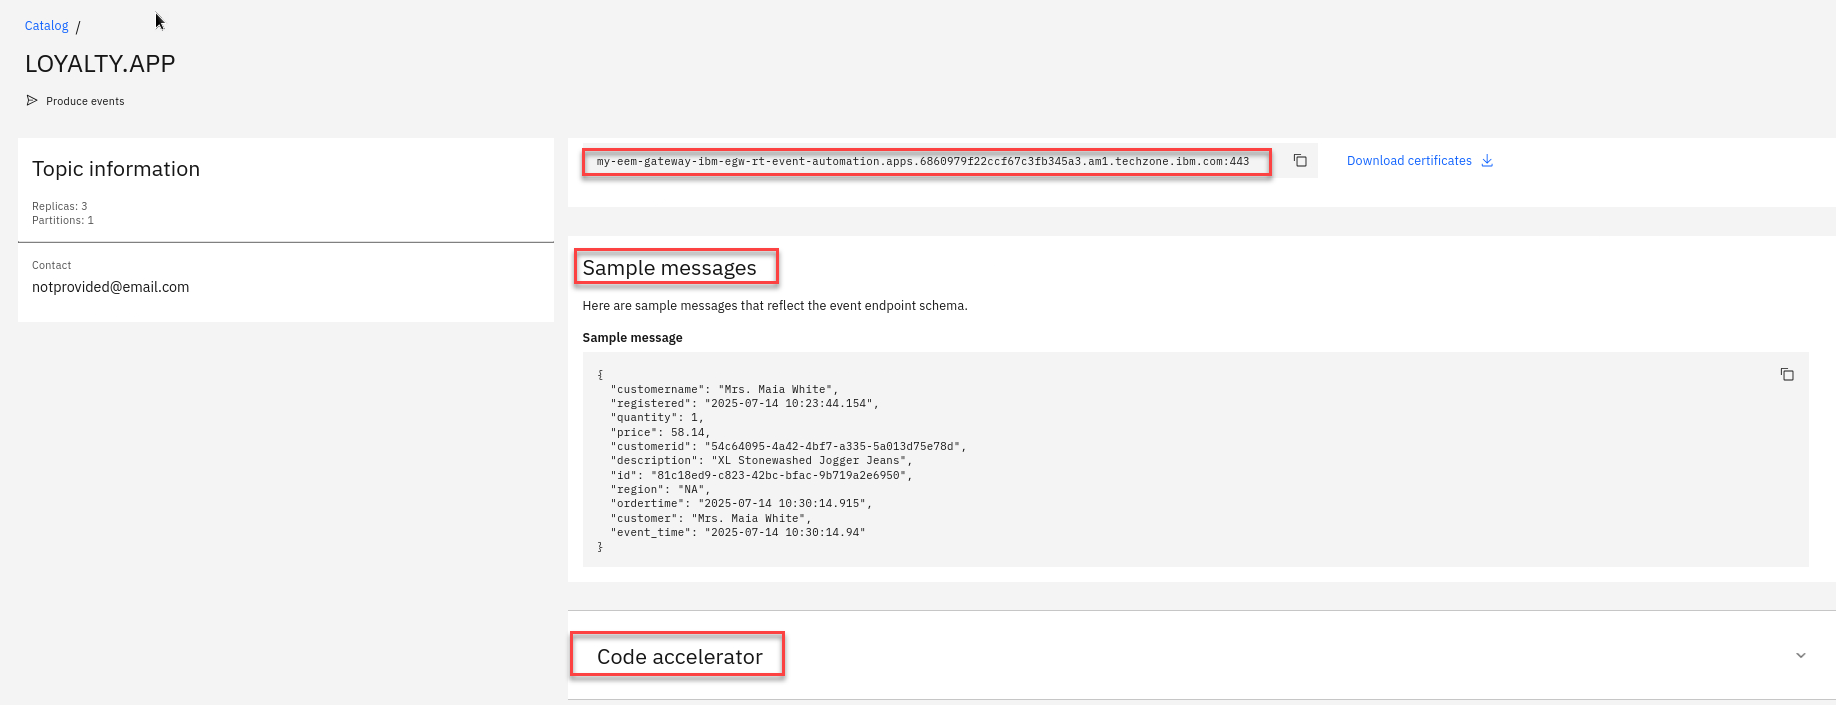
Click on the LOYALTY.APP topic to review the information about the events that are available here. Look at the schema to see the properties in the order events. You can also review Code accelerator to see code samples.
-
Will will also see what Controls have been created for this Topic. For the ORDERS.NEW we will be using the Self service Control
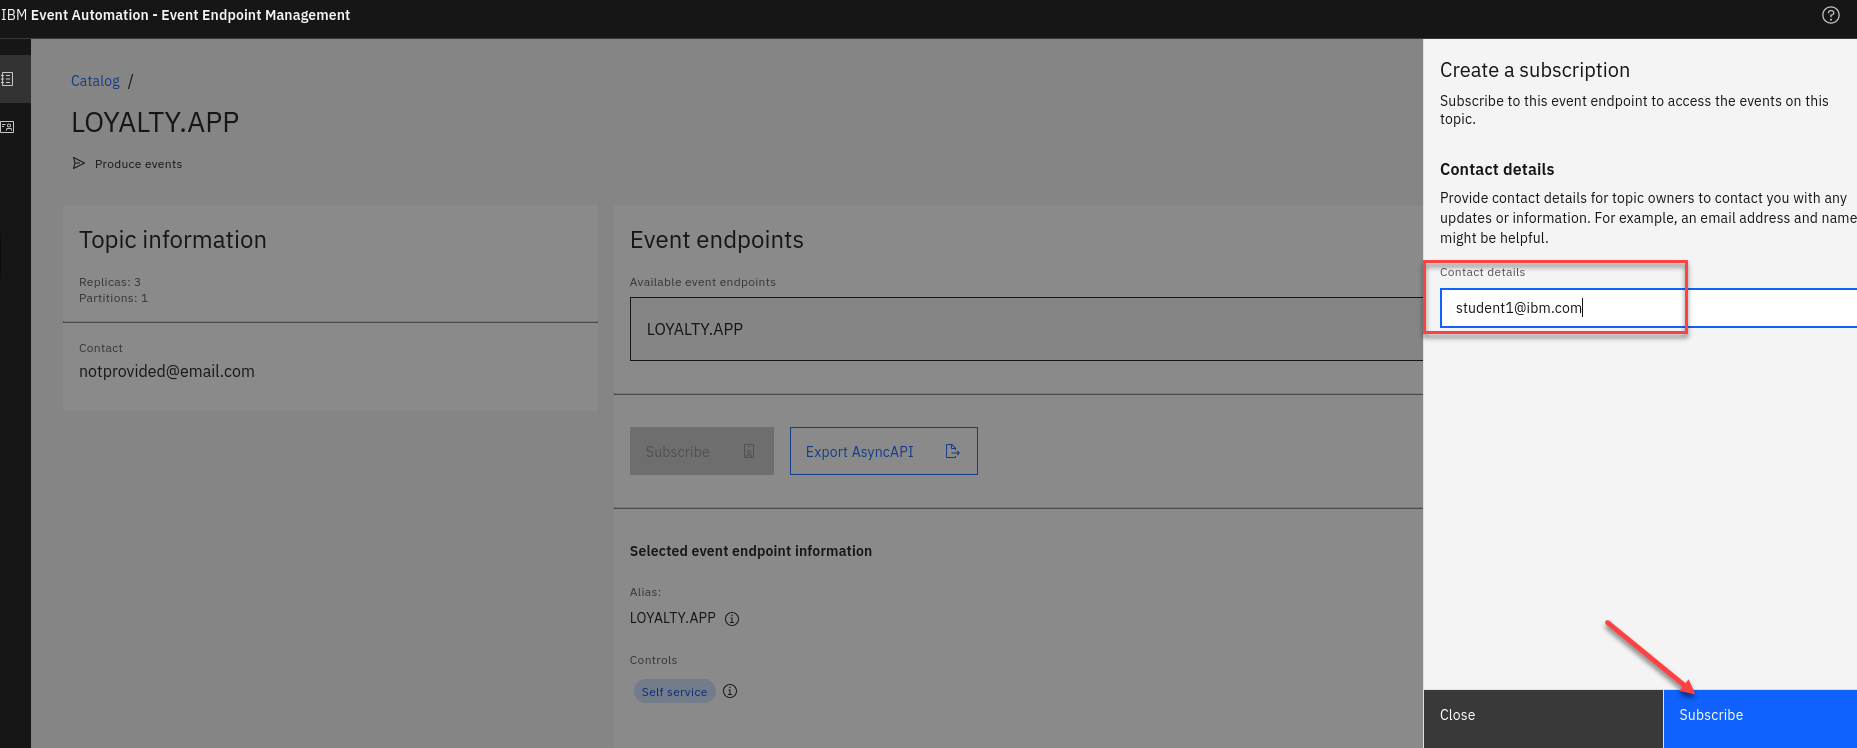
Go to top of page and select Subscribe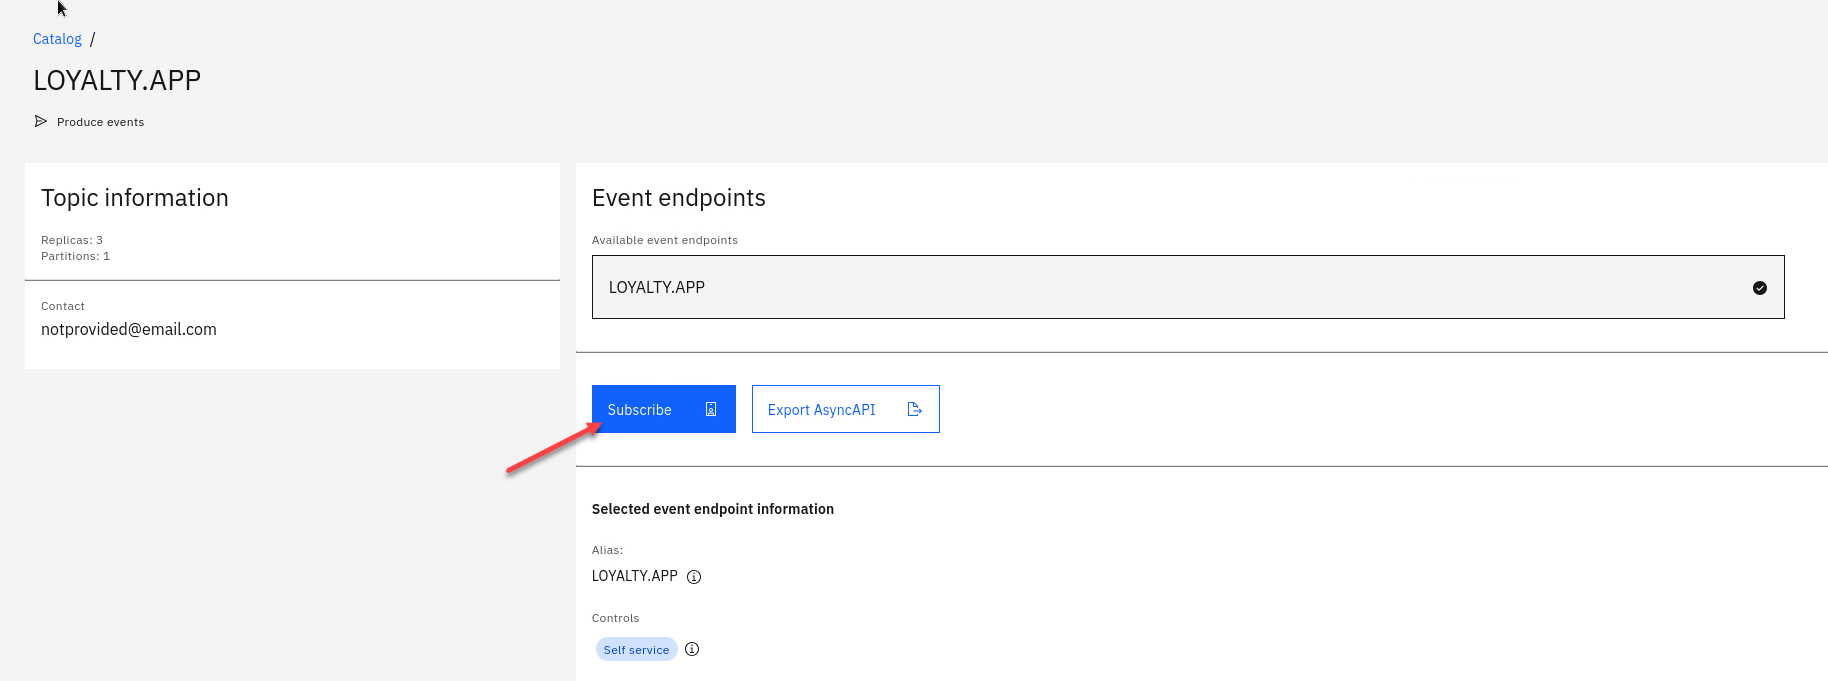
-
On the right hand side enter an email address. For this just use your student id.
Click Subscribe
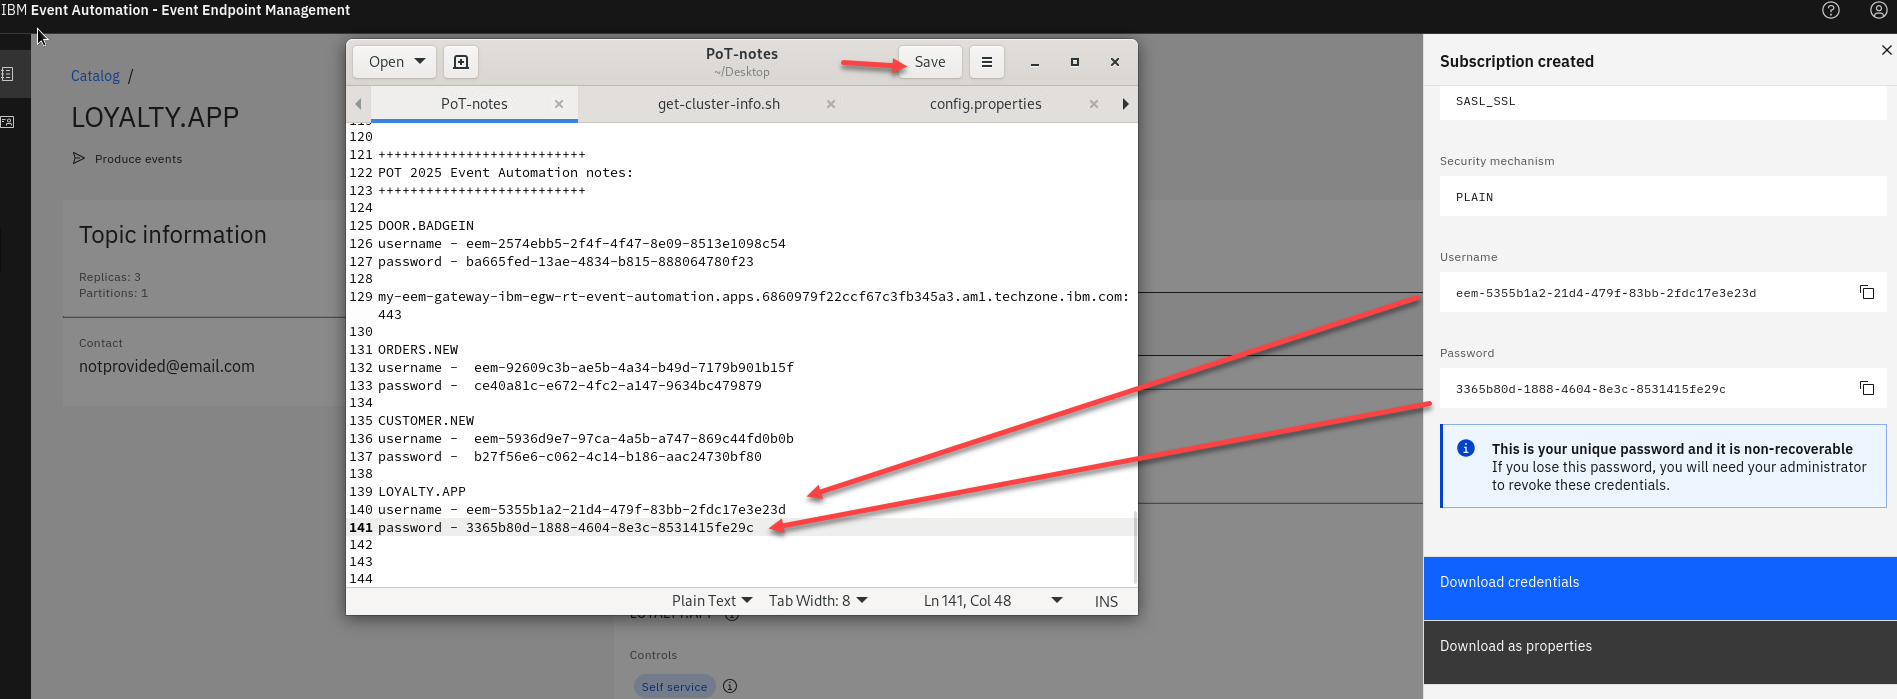
-
You will now see your Access Credentials. You will need to save these for later. On the Desktop if you open the POT-notes file that is a scratch pad to save credentials and other info for the labs.
1.2.5 Add the new Sink connector topic to Flow.
-
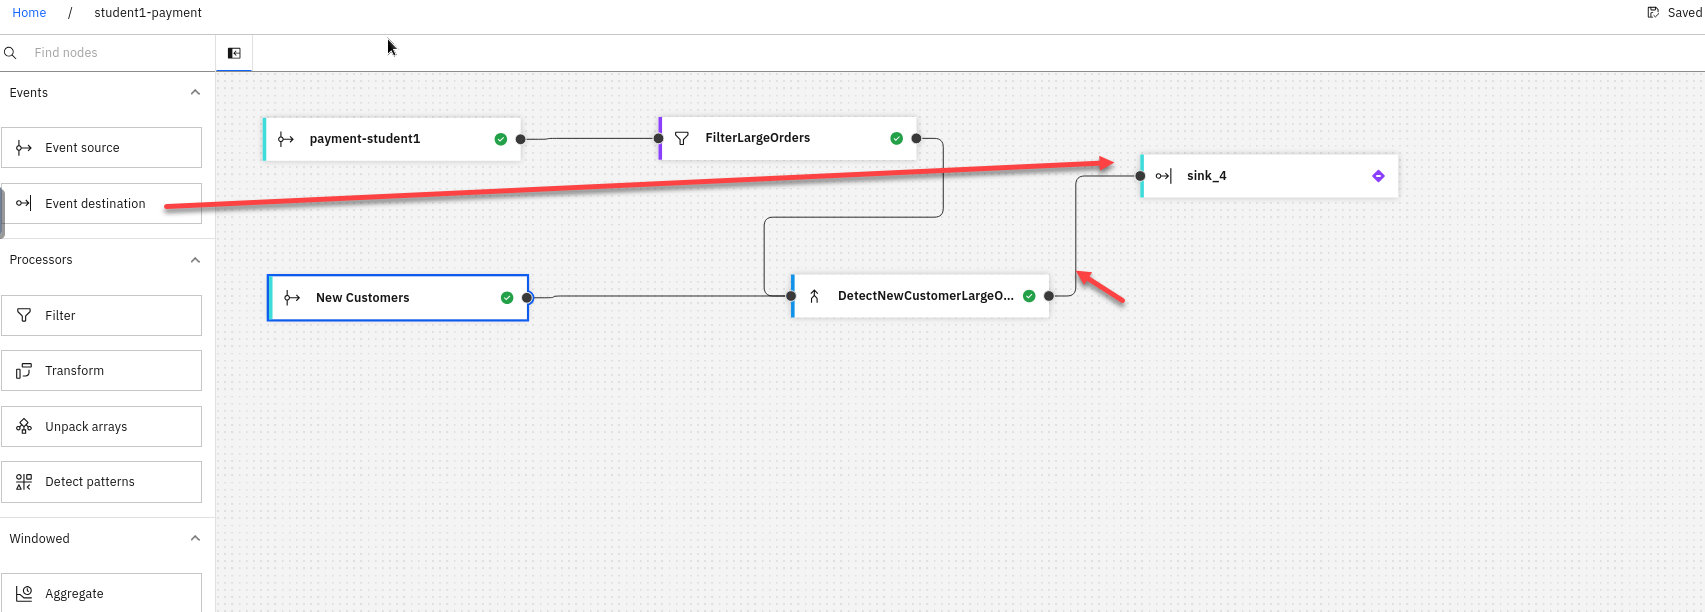
Back on the canvas for studentX-payment flow, we will add an Event destination (sink connector) to the IntervalJoin node. Drag and drop the event destination to the canvas and connect the Interval join. Hover over the new sink node and click the Edit (pencil) icon.
-
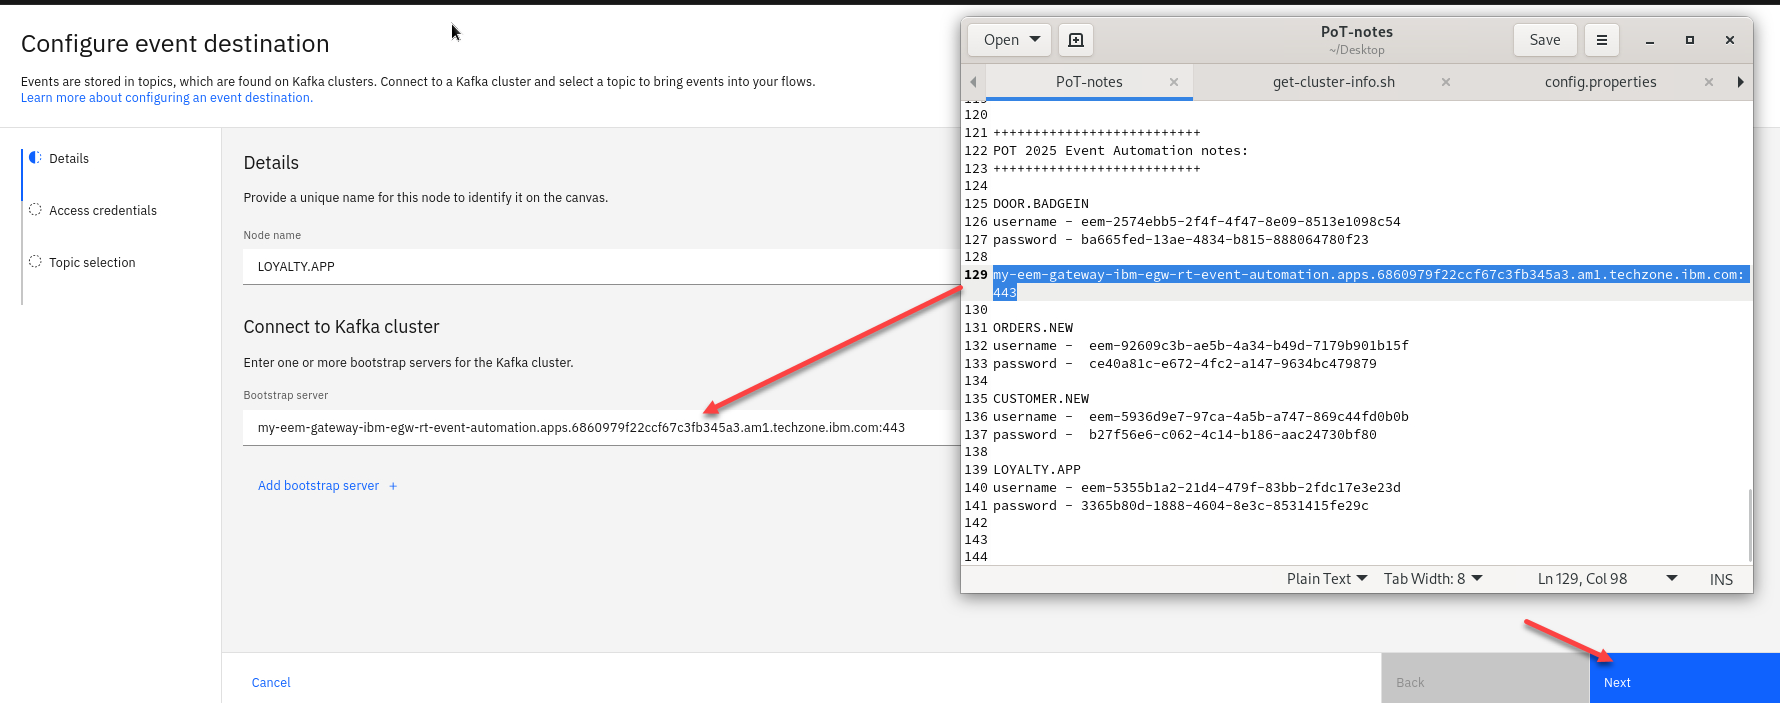
Now add the eem-gateway url to the bootstrap server and click Next
-
Next click to Accept certificates and click Next
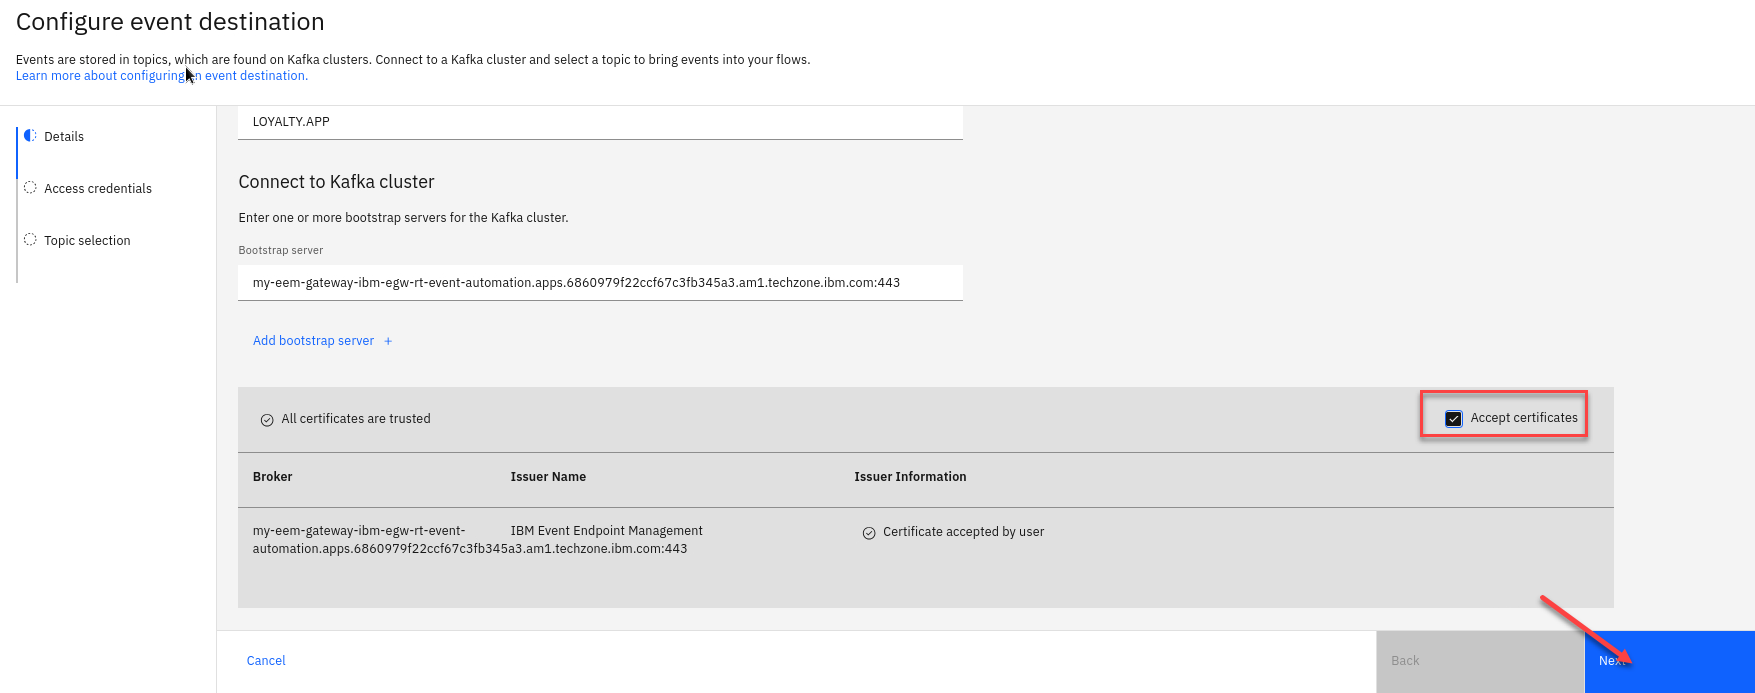
-
Now enter your credentials that you saved from when you subscripted to the topic.
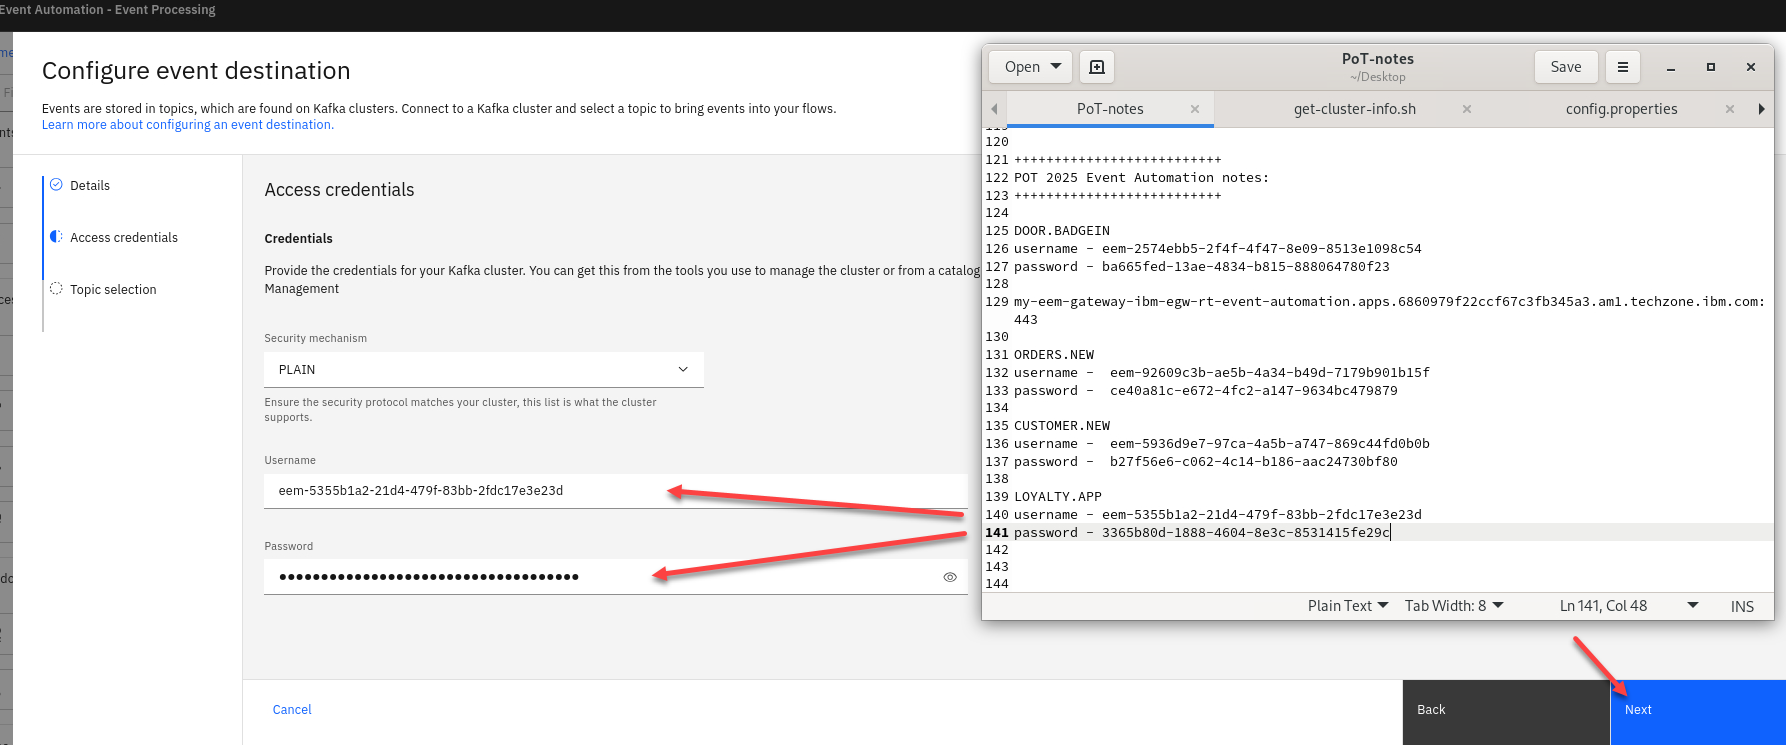
-
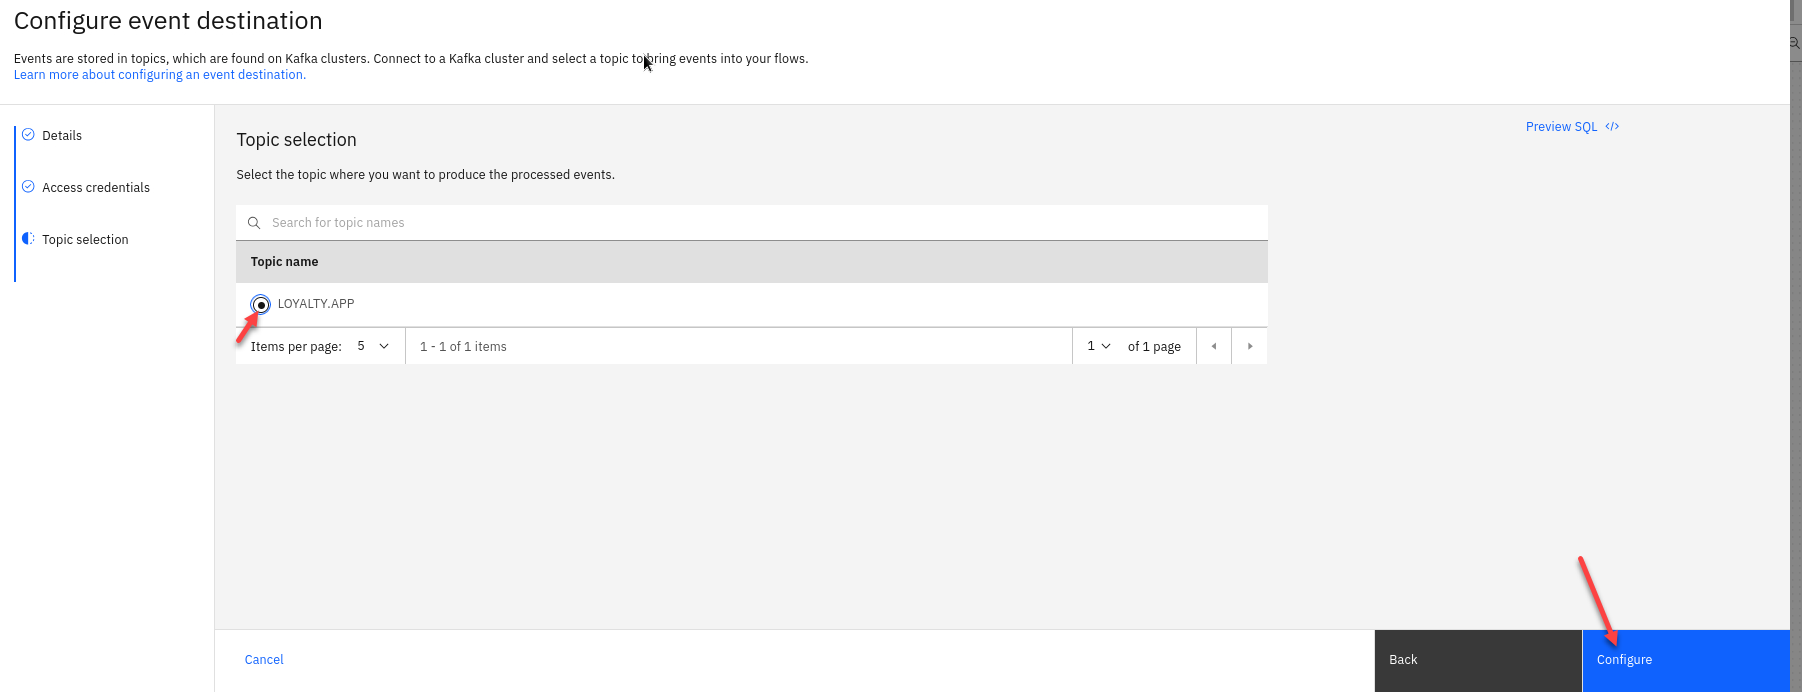
Now select the LOYALTY.APP topic and click Configure
-
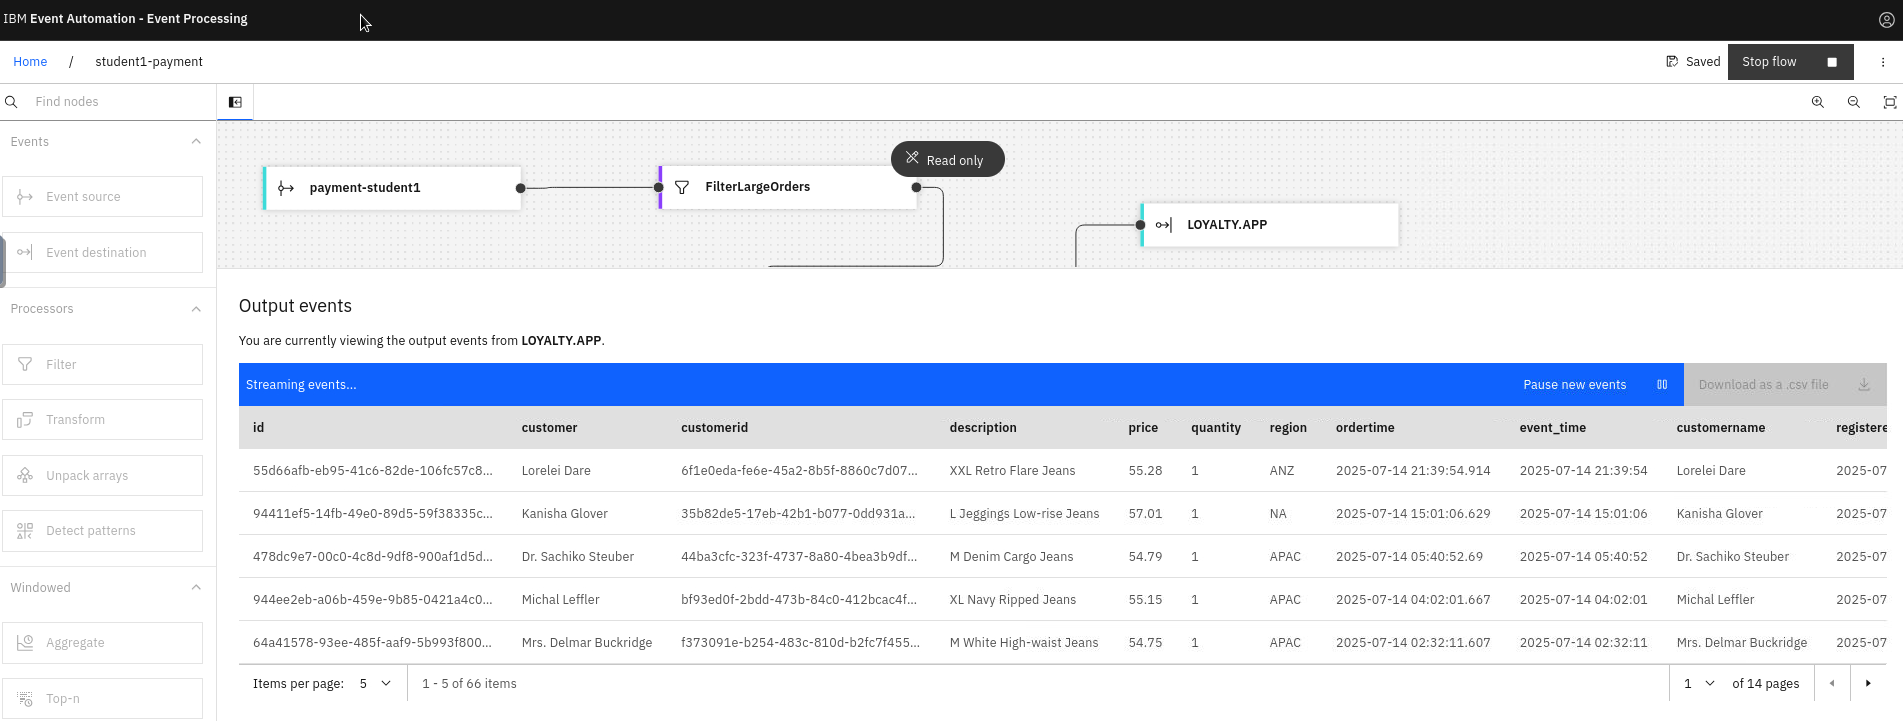
Now you can test your flow.

-
You will see your test data which is being put on to the LOYALTY.APP topic.
-
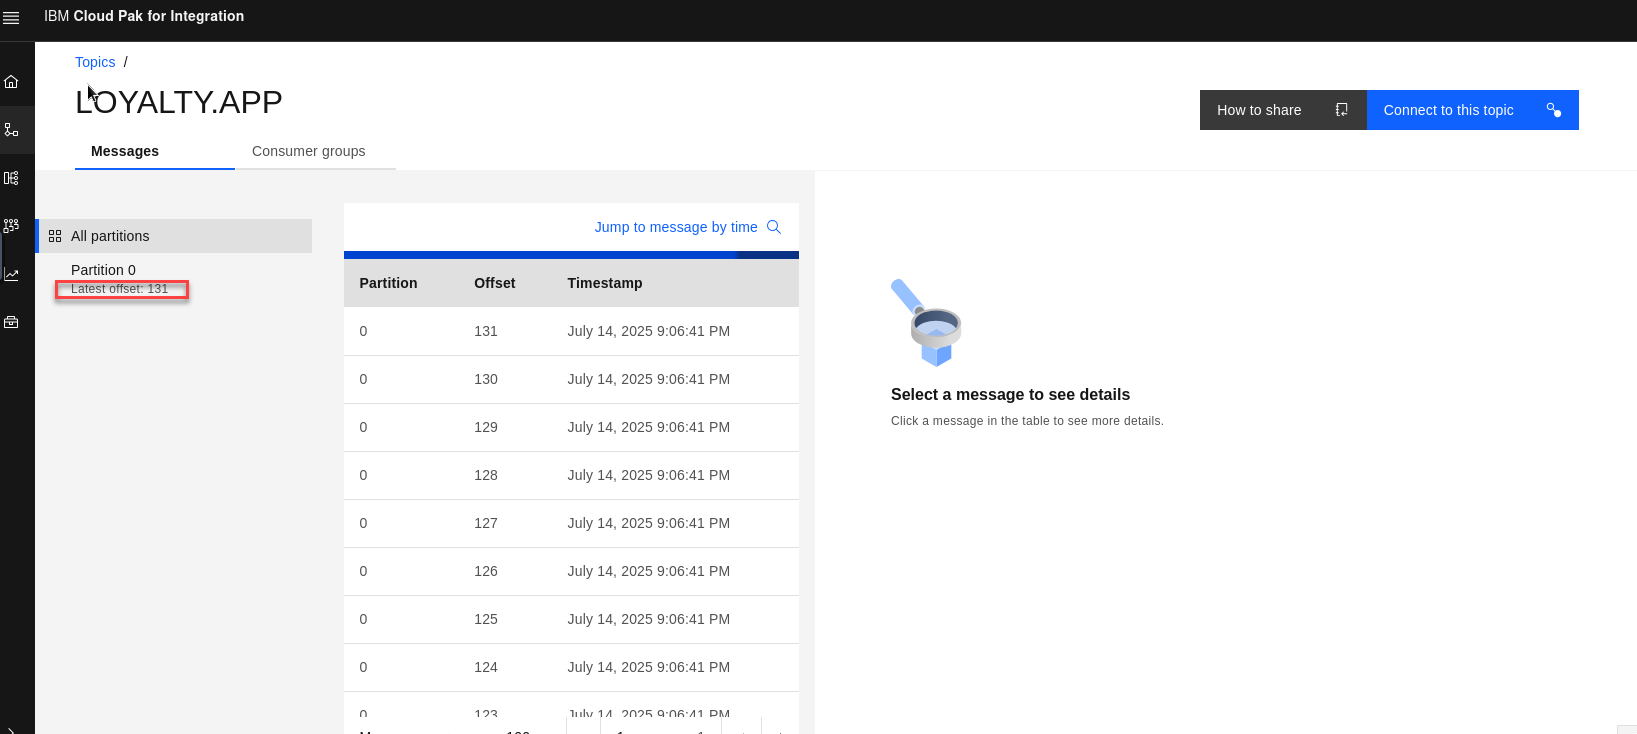
If you go to the es-demo page which shows all topics and select LOYALTY.APP topic you can check the latest offset to see that you messages were published.